Diffusion-SDF: 복셀화된 확산을 통한 텍스트-투-형상
무헝 리, 위에치 두안, 지에 저우, 그리고 지웬 루가 작성.
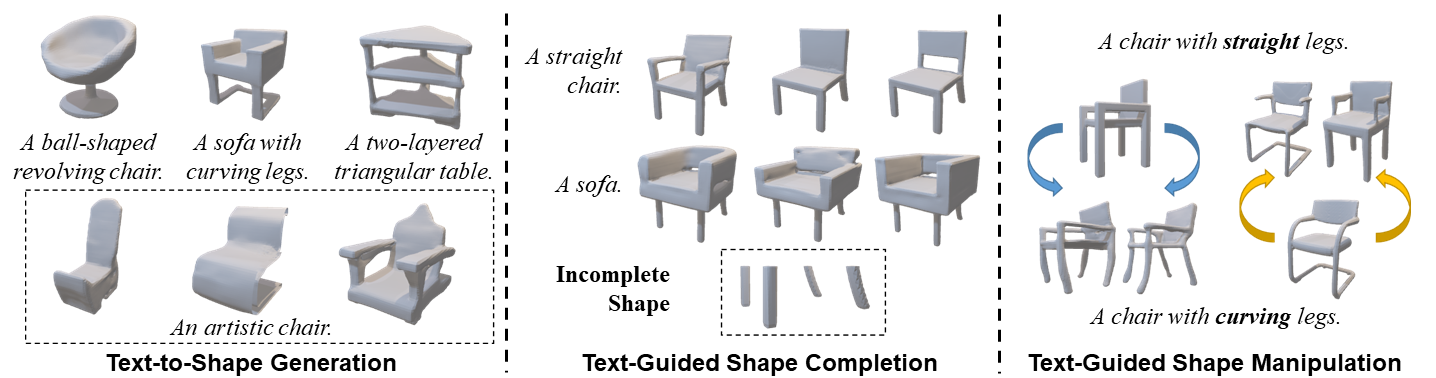
We propose a new generative 3D modeling framework called Diffusion-SDF for the challenging task of text-to-shape synthesis. Previous approaches lack flexibility in both 3D data representation and shape generation, thereby failing to generate highly diversified 3D shapes conforming to the given text descriptions. To address this, we propose a SDF autoencoder together with the Voxelized Diffusion model to learn and generate representations for voxelized signed distance fields (SDFs) of 3D shapes. Specifically, we design a novel UinU-Net architecture that implants a local-focused inner network inside the standard U-Net architecture, which enables better reconstruction of patch-independent SDF representations. We extend our approach to further text-to-shape tasks including text-conditioned shape completion and manipulation. Experimental results show that Diffusion-SDF is capable of generating both high-quality and highly diversified 3D shapes that conform well to the given text descriptions. Diffusion-SDF has demonstrated its superiority compared to previous state-of-the-art text-to-shape approaches.
[[프로젝트 페이지]](https://ttlmh.github.io/DiffusionSDF/) [[arXiv]](https://arxiv.org/abs/2212.03293)
코드
설치
Diffusion-SDF 환경을 설정하려면 제공된diffusionsdf.yml 파일을 사용하여 Conda 환경을 만들 수 있습니다. 아래 단계를 따르세요:
- 저장소를 클론합니다:
git clone https://github.com/ttlmh/Diffusion-SDF.git- 제공된 YAML 파일을 사용하여 Conda 환경을 생성하고 활성화합니다:
conda env create -f diffusionsdf.yml
conda activate diffusionsdf
사전 학습된 모델 다운로드
SDF 오토인코더 모델 파일 (vae_epoch-120.pth: 바이두 클라우드 / 구글 드라이브) 및 Voxelized Diffusion 모델 파일 (voxdiff-uinu.ckpt: 바이두 클라우드 / 구글 드라이브))을 위 링크에서 다운로드하세요. 다운로드한 모델 파일을 ``./ckpt` 디렉토리에 위치시키세요.
추론
텍스트-투-쉐입 생성
Diffusion-SDF를 사용해 텍스트 설명으로부터 3D 형태를 생성하려면 다음 명령을 실행하세요:python txt2sdf.py --prompt "a revolving chair" --save_obj
생성된 3D 형상은 outputs/ 폴더 아래에 GIF 렌더링 및 OBJ 파일로 저장됩니다.텍스트 조건형 형상 완성
부분적/불완전한 3D 형상(.h5 SDF 파일)과 텍스트 프롬프트가 주어지면, Diffusion-SDF는 누락된 영역을 완성할 수 있습니다:# Axial cut: mask out the bottom half along the Z axis
python shape_completion.py \
--input_sdf path/to/partial.h5 \
--prompt "a wooden chair" \
--mask_axis z --mask_ratio 0.5SDF-value based masking (mask voxels with SDF >= threshold)
python shape_completion.py \
--input_sdf path/to/shape.h5 \
--prompt "a dining table" \
--mask_type threshold --mask_value 0.0
결과물(GIF 렌더링 및 선택적 OBJ 파일)은 outputs/shape_completion/에 저장됩니다.텍스트 조건형 형태 조작
기존 3D 형태와 텍스트 프롬프트가 주어지면, Diffusion-SDF는 SDEdit 방식을 통해 형태를 수정합니다 — 형태를 잠재 공간에 인코딩하고, 선택된 타임스텝까지 노이즈를 추가한 후, 새 텍스트 프롬프트로 노이즈를 제거합니다:# Moderate manipulation (50% noise strength)
python shape_manipulation.py \
--input_sdf path/to/shape.h5 \
--prompt "a chair with a cushion" \
--strength 0.5Strong manipulation (75% noise strength — more creative freedom)
python shape_manipulation.py \
--input_sdf path/to/shape.h5 \
--prompt "a modern minimalist chair" \
--strength 0.75
결과는 outputs/shape_manipulation/에 저장되며, 비교를 위해 원본 형태의 렌더링도 포함됩니다.
학습
데이터 준비
학습에는 두 가지가 필요합니다: 3D 형태의 복셀화된 SDF 파일과 Text2Shape에서 가져온 텍스트 캡션입니다.
#### 단계 0 — ShapeNet Core v1 다운로드
ShapeNet Core v1에 등록하고 다운로드한 뒤 적절한 위치(예:
data/ShapeNetCore.v1/)에 압축을 풉니다.#### 단계 1 — 64³ SDF 볼륨 사전 계산
ShapeNet은 삼각형 메쉬를 제공합니다; 오토인코더와 확산 모델은 64³ 그리드의 복셀화된 부호 거리 필드를 필요로 하며, HDF5 파일로 저장됩니다. 우리는 SDFusion과 동일한 전처리 파이프라인을 따릅니다:
# Install system dependencies (Ubuntu/Debian)
sudo apt-get install freeglut3-dev libtbb-devClone SDFusion and run their SDF generation scripts
(see SDFusion repo for the full launcher scripts)
cd preprocess
bash launch_create_sdf_shapenet.sh \
--shapenet_root data/ShapeNetCore.v1 \
--out_root data/ShapeNet/sdf
예상 출력 레이아웃은:
data/ShapeNet/
sdf/
/ e.g. 03001627 (chair), 04379243 (table)
/
pc_sdf_sample.h5 float32 array of shape (262144,) = 64³ SDF values
HDF5 키는 pc_sdf_sample이며 배열은 평면으로 저장됩니다 (262144 = 64×64×64 요소).#### 2단계 — Text2Shape 캡션 준비
Text2Shape는 ShapeNet의 의자와 테이블에 대해서만 자연어 설명을 제공합니다. 다른 카테고리는 무조건적으로(빈 캡션) 학습됩니다.
# Download the caption CSV
mkdir -p data/ShapeNet/text
wget http://text2shape.stanford.edu/dataset/captions.tablechair.csv \
-O data/ShapeNet/text/captions.tablechair.csvConvert to captions.json and generate train/val/test splits
python preprocess/prepare_text2shape.py --data_root data/ShapeNet
이것은 다음을 생성합니다:data/ShapeNet/
text/
captions.tablechair.csv (raw Text2Shape CSV)
captions.json {model_id: [caption, ...]}
train_models.json [model_id, ...]
val_models.json
test_models.json
ShapeNet의 공식 분할 JSON 파일이 있는 경우, 무작위 분할 대신 정식 분할을 사용하려면
--shapenet_split_dir과 함께 전달하세요:python preprocess/prepare_text2shape.py \
--data_root data/ShapeNet \
--shapenet_split_dir data/ShapeNet/splits
1단계 — SDF 오토인코더 학습
64³ SDF 볼륨을 압축된 8³ 잠재 공간으로 인코딩하는 패치 단위 변분 오토인코더를 학습합니다: # Single GPU
python train_ae.py --data_root data/ShapeNet --cat allResume from a checkpoint
python train_ae.py --data_root data/ShapeNet \
--resume ckpt/vae_epoch-120.pth --start_epoch 121Multi-GPU (DDP via torchrun)
torchrun --nproc_per_node=4 train_ae.py --data_root data/ShapeNet --dist_train
체크포인트는 ./ckpt/에 vae_epoch-{N}.pth 형식으로 저장됩니다.2단계 — 복셀화된 확산 모델 학습
AE가 학습된 후, PyTorch Lightning을 사용하여 텍스트 조건부 3D 확산 모델을 학습합니다:# Single GPU
python main.py --config configs/voxdiff-uinu.yamlResume from a checkpoint
python main.py --config configs/voxdiff-uinu.yaml --resume /path/to/checkpoint.ckptMulti-GPU
python main.py --config configs/voxdiff-uinu.yaml --gpus 0,1,2,3
체크포인트는
logs/감사의 글
우리 코드는 Stable-Diffusion와 AutoSDF를 기반으로 합니다.인용
본 연구가 귀하의 연구에 유용하다면, 다음을 인용해 주시기 바랍니다:@inproceedings{li2023diffusionsdf,
author={Li, Muheng and Duan, Yueqi and Zhou, Jie and Lu, Jiwen},
title={Diffusion-SDF: Text-to-Shape via Voxelized Diffusion},
booktitle={Proceedings of the IEEE Conference on Computer Vision and Pattern Recognition (CVPR)},
year={2023}
}--- Tranlated By Open Ai Tx | Last indexed: 2026-04-13 ---