Diffusion-SDF: ボクセル化拡散によるテキストから形状への変換
We propose a new generative 3D modeling framework called Diffusion-SDF for the challenging task of text-to-shape synthesis. Previous approaches lack flexibility in both 3D data representation and shape generation, thereby failing to generate highly diversified 3D shapes conforming to the given text descriptions. To address this, we propose a SDF autoencoder together with the Voxelized Diffusion model to learn and generate representations for voxelized signed distance fields (SDFs) of 3D shapes. Specifically, we design a novel UinU-Net architecture that implants a local-focused inner network inside the standard U-Net architecture, which enables better reconstruction of patch-independent SDF representations. We extend our approach to further text-to-shape tasks including text-conditioned shape completion and manipulation. Experimental results show that Diffusion-SDF is capable of generating both high-quality and highly diversified 3D shapes that conform well to the given text descriptions. Diffusion-SDF has demonstrated its superiority compared to previous state-of-the-art text-to-shape approaches.
[[プロジェクトページ]](https://ttlmh.github.io/DiffusionSDF/) [[arXiv]](https://arxiv.org/abs/2212.03293)
コード
インストール
Diffusion-SDF 環境をセットアップするには、提供されているdiffusionsdf.yml ファイルを使って Conda 環境を作成できます。以下の手順に従ってください:
- リポジトリをクローンする:
git clone https://github.com/ttlmh/Diffusion-SDF.git- 提供されたYAMLファイルを使用してConda環境を作成し、アクティベートします:
conda env create -f diffusionsdf.yml
conda activate diffusionsdf
事前学習済みモデルのダウンロード
SDFオートエンコーダーモデルファイル(vae_epoch-120.pth: Baidu Disk / Google Drive)とボクセライズドディフュージョンモデルファイル(voxdiff-uinu.ckpt: Baidu Disk / Google Drive)を上記リンクからダウンロードしてください。ダウンロードしたモデルファイルをディレクトリ``./ckpt`に配置してください。
推論
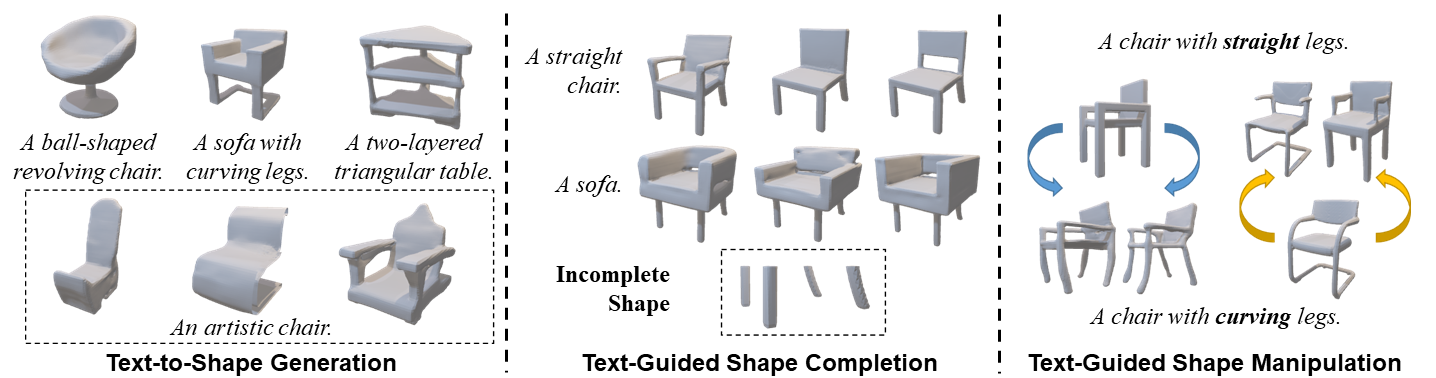
テキストから形状生成
Diffusion-SDFを使ってテキスト記述から3D形状を生成するには、次のコマンドを実行します:python txt2sdf.py --prompt "a revolving chair" --save_obj
生成された3D形状は、GIFレンダリングおよびOBJファイルとしてoutputs/フォルダに保存されます。テキスト条件付き形状補完
部分的/不完全な3D形状(.h5形式のSDFファイル)とテキストプロンプトが与えられると、Diffusion-SDFは欠損部分を補完できます:# Axial cut: mask out the bottom half along the Z axis
python shape_completion.py \
--input_sdf path/to/partial.h5 \
--prompt "a wooden chair" \
--mask_axis z --mask_ratio 0.5SDF-value based masking (mask voxels with SDF >= threshold)
python shape_completion.py \
--input_sdf path/to/shape.h5 \
--prompt "a dining table" \
--mask_type threshold --mask_value 0.0
結果(GIFレンダリングおよびオプションのOBJファイル)は outputs/shape_completion/ に保存されます。テキスト条件付き形状操作
既存の3D形状とテキストプロンプトが与えられると、Diffusion-SDFはSDEditアプローチを通じて形状を変更します — 形状を潜在空間にエンコードし、選択したタイムステップまでノイズを加え、次に新しいテキストプロンプトでノイズ除去を行います:# Moderate manipulation (50% noise strength)
python shape_manipulation.py \
--input_sdf path/to/shape.h5 \
--prompt "a chair with a cushion" \
--strength 0.5Strong manipulation (75% noise strength — more creative freedom)
python shape_manipulation.py \
--input_sdf path/to/shape.h5 \
--prompt "a modern minimalist chair" \
--strength 0.75
結果は outputs/shape_manipulation/ に保存され、比較用に元の形状のレンダリングも含まれます。
トレーニング
データ準備
トレーニングには2つのものが必要です:3D形状用のボクセル化されたSDFファイルと、Text2Shapeからのテキストキャプションです。
#### ステップ0 — ShapeNet Core v1のダウンロード
ShapeNet Core v1 に登録してダウンロードし、どこかに展開します(例:
data/ShapeNetCore.v1/)。#### ステップ1 — 64³ SDFボリュームの事前計算
ShapeNetは三角形メッシュを提供します。オートエンコーダーと拡散モデルは64³グリッド上のボクセル化された符号付き距離場を必要とし、HDF5ファイルとして保存します。SDFusion と同じ前処理パイプラインに従います:
# Install system dependencies (Ubuntu/Debian)
sudo apt-get install freeglut3-dev libtbb-devClone SDFusion and run their SDF generation scripts
(see SDFusion repo for the full launcher scripts)
cd preprocess
bash launch_create_sdf_shapenet.sh \
--shapenet_root data/ShapeNetCore.v1 \
--out_root data/ShapeNet/sdf
期待される出力レイアウトは次のとおりです:
data/ShapeNet/
sdf/
/ e.g. 03001627 (chair), 04379243 (table)
/
pc_sdf_sample.h5 float32 array of shape (262144,) = 64³ SDF values
HDF5キーは
pc_sdf_sample であり、配列はフラットに格納されています(262144 = 64×64×64 要素)。#### ステップ2 — Text2Shapeのキャプションを準備する
Text2Shape はShapeNetの椅子とテーブルに対してのみ自然言語による説明を提供します。その他のカテゴリは無条件(空のキャプション)で学習されます。
# Download the caption CSV
mkdir -p data/ShapeNet/text
wget http://text2shape.stanford.edu/dataset/captions.tablechair.csv \
-O data/ShapeNet/text/captions.tablechair.csvConvert to captions.json and generate train/val/test splits
python preprocess/prepare_text2shape.py --data_root data/ShapeNet
これは以下を生成します:data/ShapeNet/
text/
captions.tablechair.csv (raw Text2Shape CSV)
captions.json {model_id: [caption, ...]}
train_models.json [model_id, ...]
val_models.json
test_models.json
ShapeNetの公式分割JSONファイルをお持ちの場合は、
--shapenet_split_dir オプションで指定すると、ランダム分割の代わりに正規の分割を使用します:python preprocess/prepare_text2shape.py \
--data_root data/ShapeNet \
--shapenet_split_dir data/ShapeNet/splits
ステップ1 — SDFオートエンコーダの訓練
64³のSDFボリュームをコンパクトな8³の潜在空間にエンコードするパッチ単位の変分オートエンコーダを訓練します:# Single GPU
python train_ae.py --data_root data/ShapeNet --cat allResume from a checkpoint
python train_ae.py --data_root data/ShapeNet \
--resume ckpt/vae_epoch-120.pth --start_epoch 121Multi-GPU (DDP via torchrun)
torchrun --nproc_per_node=4 train_ae.py --data_root data/ShapeNet --dist_train
チェックポイントは
./ckpt/ に vae_epoch-{N}.pth として保存されます。ステップ2 — ボクセル化拡散モデルの訓練
AEの訓練が完了したら、PyTorch Lightningを使用してテキスト条件付き3D拡散モデルを訓練します:# Single GPU
python main.py --config configs/voxdiff-uinu.yamlResume from a checkpoint
python main.py --config configs/voxdiff-uinu.yaml --resume /path/to/checkpoint.ckptMulti-GPU
python main.py --config configs/voxdiff-uinu.yaml --gpus 0,1,2,3
チェックポイントは logs/謝辞
私たちのコードは Stable-Diffusion と AutoSDF を基にしています。引用
もし本研究があなたの研究に役立った場合は、以下の文献を引用してください:@inproceedings{li2023diffusionsdf,
author={Li, Muheng and Duan, Yueqi and Zhou, Jie and Lu, Jiwen},
title={Diffusion-SDF: Text-to-Shape via Voxelized Diffusion},
booktitle={Proceedings of the IEEE Conference on Computer Vision and Pattern Recognition (CVPR)},
year={2023}
}--- Tranlated By Open Ai Tx | Last indexed: 2026-04-13 ---