🌐 Language
DIY Smart Home Family Calendar (Skylight Clone)
📖 Introduction
Recently, my wife has been bombarded on social media with ads for smart home calendars (Skylight, Cozyla, Hearth) and was ready to spend over $300 on one. Before giving her approval, I asked for a chance to research them. I realized most offered similar functionality but differed significantly in price. Most importantly, I didn't see any outstanding feature that I couldn't implement in Home Assistant.
The Goal: A WAF-approved (Wife Acceptance Factor), countertop-friendly touchscreen calendar that integrates deep into our smart home without monthly fees.
💡 Why DIY?
Choosing the DIY route with Home Assistant provided several benefits over buying a Skylight/Hearth display:
- No Monthly Fees: Avoids subscriptions for "premium" features.
- Seamless Integration: It talks to our lights, chores (Grocy), and presence sensors.
- Old Hardware: Repurposed a Mini PC and a standard monitor.
- Privacy: No vendor lock-in or risk of the company shutting down.
🛠 Hardware Selection
This is currently built to show the dashboard on any HD (1920x1080) display.
In my case, the requirement was for it to "look like" skylight, be touchscreen, be countertop, possibility to move it to different locations. Therefore I went with the hardware described below. Nevertheless, you case might be different and will need you to adjust it as needed, for example if you want to display it on a tablet or something else.
The hardware I originally used I chose based on what I mentioned above plus with the hope to be able to extend functionality using the webcam, speaker and microphone. Currently I would probably build it differently now in hindsight, since I havent had time to address these additional hardware ideas.
- Monitor: HP Engage 15-inch Touchscreen. I chose this over generic portable monitors because it includes a built-in Speaker, Webcam, and Microphone, allowing for future voice control or video calls.
- Computer: An old Mini PC (NUC/Tiny PC) running Windows/Linux in Kiosk mode, or a Raspberry Pi 4.~~
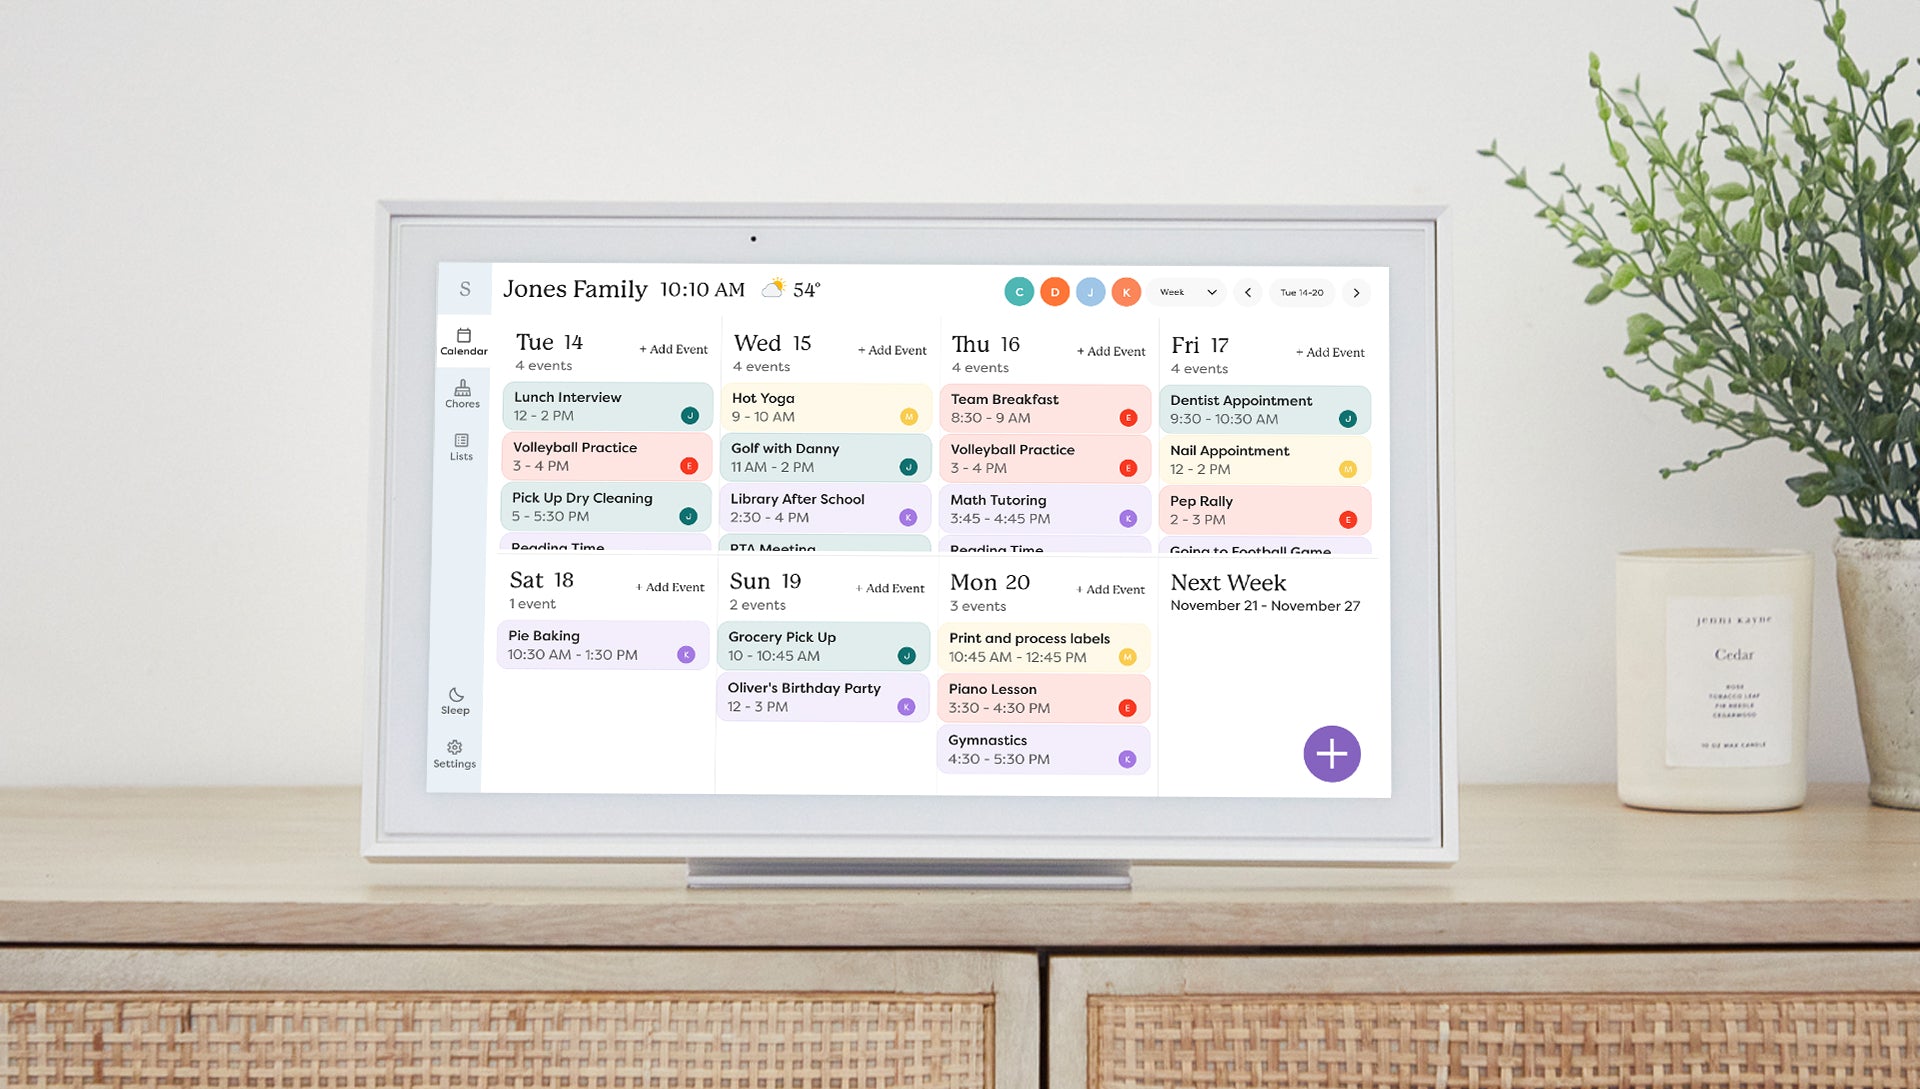
✨ Features
- Family-wide & Individual Views: Toggle specific family members' calendars on/off.
- Two-way Sync: Edit events on the screen or on our phones (Google Calendar).
- "Add Event" Popup: A custom UI to add events to specific calendars directly from the screen.
- Weather & Date: Beautiful, glanceable header.
- Responsive: Automatically adjusts day-count based on screen width (Mobile vs Desktop).
⚙️ Installation Guide
Note: This setup uses a YAML Package to automatically create all the necessary helpers, scripts, and variables for you. You do not need to create them manually.
1. Prerequisites (HACS)
You must have HACS installed. Please install the following Frontend integrations:
week-planner-cardbubble-cardconfig-template-cardcard-modbetter-moment-cardweather-cardbrowser_mod(Required for the popups to work)layout-card(Required for the Sections view)button-card(Required for the popup to add event)
2. The Backend (The Brains)
- Open your
configuration.yamlfile in Home Assistant. - Ensure you have this line added under
homeassistant:to enable packages:
homeassistant:
packages: !include_dir_named packages
``- Create a folder named
in your HA config directory (if you don't have one).
Download packages/family_calendar.yaml from this repo.
Search for string [ #<--- UPDATE THIS ENTITY] and update the calendar entity ID to match your environment. Check section 3 for more details.
Place the file inside your packages/ folder.
Restart Home Assistant. 3. The Calendars
You can use Google Calendars or Local Calendars.
#### Option A: Reuse Calendar Names (Easiest)
- Go to Settings > Devices & Services.
- Add the Local Calendar integration.
- Create calendars named exactly:
calendar1, calendar2, calendar3, calendar4, Family.
If you use these names, the code works out of the box!*#### Option B: Custom Calendar
- Go to Settings > Devices & Services.
- Add the Local Calendar integration. or Google Calendar.
- Navigate to Configuration > Integrations > Local Calendar or Google Calendar and select "Add Entry"
- For each created entry, get the entity ID for updating the dashboard.yaml file.
- Open
dashboard.yaml.
Search for # <--- UPDATE THIS ENTITY.
Update the entity ID matching your environment
#### Setting up Holidays
Since Home Assistant updates, Holidays are now added via UI:
- Go to Settings > Devices & Services > Add Integration > Holiday.
- Select your country.
- Check the entity ID (e.g.,
calendar.holidays). If it differs from the default, update it in the dashboard YAML.4. The Dashboard (The Look)
- Go to Settings > Dashboard
- Click on Add Dashboard (Select option "New Dashboard from Scratch" make sure to select "Add to sidebar").
- On the left menu, select the newly created dashboard and click on the pencil icon to edit it.
- Select the 3 dots icon and choose "Raw configurator editor".
- Copy and paste the code from dashboard.yaml.
Step 5: The Theme (Optional)
To get the specific font look (Ovo):
- Ensure your
configuration.yaml has this line under frontend:
yaml
frontend:
themes: !include_dir_merge_named themes
`
- Create a folder named
themes in your config directory.
Download themes/skylight.yaml and place it in that folder.
Use File Editor and upload calbackgrd.png to the /www/ folder, which translates internally to /local on the dashboard.
Restart Home Assistant.
Go to your Profile (User Icon bottom left) and change Theme to Skylight.
NOTE: The theme is not comprehensive, so keep that in mind
📐 How It Works (Under the Hood)
Filter Logic
The
week-planner-card does not natively support hiding specific calendars on the fly. To solve this, I used Input Texts acting as Regex filters. When you click a person's button, it toggles their filter between
. (Show everything) and ^$ (Show nothing).
config-template-card injects these variables into the calendar card dynamically.Event Creation Script
The "Add Event" popup uses a single script that handles logic for multiple people and event types (All Day vs Timed).
Simplified Logic Example
target_calendar: "{{ calendar_map.get(states('input_select.calendar_select')) }}"choose:
- conditions: "All Day Event is ON"
- conditions: "All Day Event is OFF"
NOTES
My original post was just to give a high level overview of how to do it and allow people to adjust code to make it work in their specific scenarios.
In particular I did this because every display and need is different. I can't develop for all potential sizes of displays, dashboards, etc. So it is built to work in the display I mentioned or any (1920x1080) but should be editable for others.
Talking about display, I originally suggested that one because it was on sale at Woot and was a very economic way to get a touchscreen display at the time. This might not be the case now, so use whatever display works for you. Tablet, touchscreen, phone, whatever. The main thing youll need to edit is the dashboard.
--- Tranlated By Open Ai Tx | Last indexed: 2026-03-08 ---