Taskosaur
![]()
具有对话式 AI 任务执行的开源项目管理
📹 观看 Taskosaur 实际演示
点击观看:了解对话式 AI 任务执行在 Taskosaur 中的工作原理
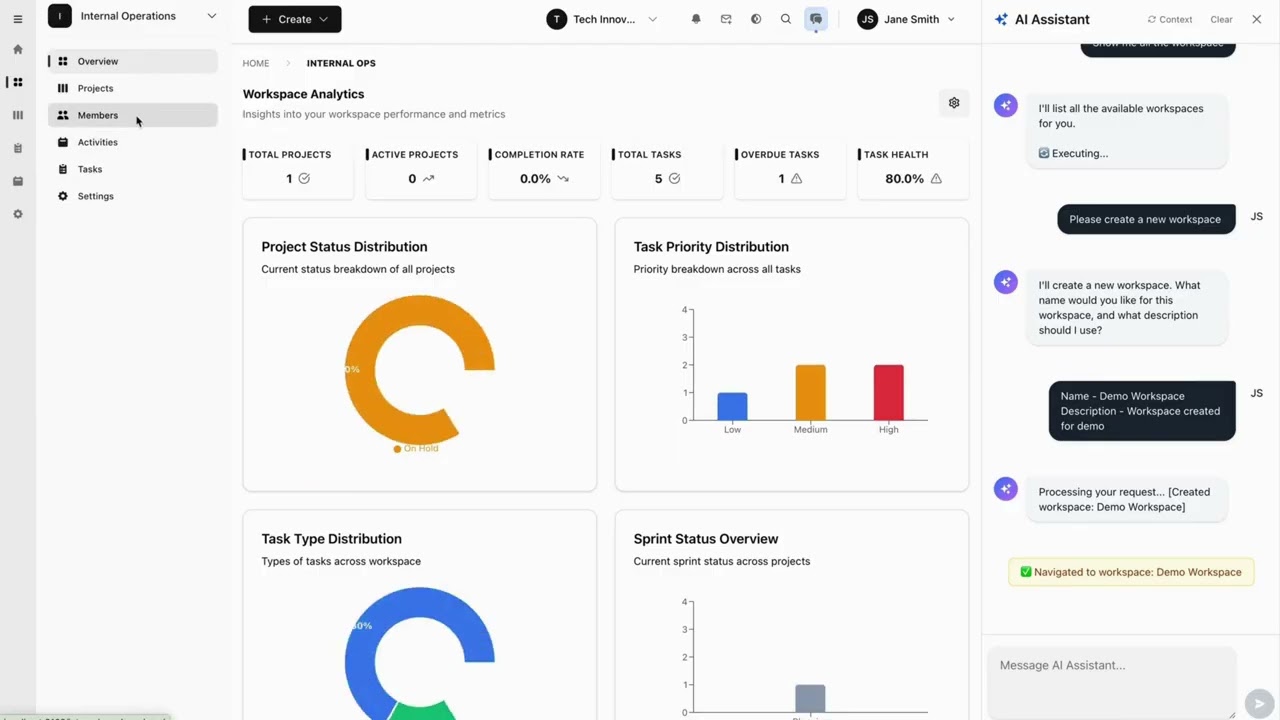
Taskosaur 是一个开源项目管理平台,内置对话式 AI 用于应用内任务执行。AI 助手通过自然对话处理项目管理任务,从创建任务到直接在应用内管理工作流程。
![]()
![]()
![]()
![]()
![]()
![]()
![]()
Taskosaur 结合了传统项目管理功能与对话式 AI 任务执行,允许你通过自然语言对话管理项目。无需导航菜单和表单,你只需描述需求,即可创建任务、分配工作和管理工作流程。
主要功能
- 🤖 对话式 AI 任务执行 - 通过应用内自然对话执行项目任务
- 💬 自然语言命令 - “创建包含上周高优先级 bug 的冲刺”自动执行
- 🏠 自托管 - 你的数据保存在你自己的基础设施上
- 💰 自带大语言模型 - 使用你的 OpenAI、Anthropic、OpenRouter 或本地模型 API 密钥
- 🔧 应用内浏览器自动化 - AI 导航界面并直接在应用内执行操作
- 📊 完整项目管理 - 看板、冲刺、任务依赖、时间跟踪
- 🌐 开源 - 在商业源代码许可证(BSL)下发布
目录
快速开始
前提条件
- Node.js 22+ 和 npm 10+
- PostgreSQL 16+(或使用 Docker)
- Redis 7+(或使用 Docker)
Docker 设置(推荐)
使用 Docker Compose 是开始使用 Taskosaur 的最快方式:
- 克隆仓库
git clone https://github.com/Taskosaur/Taskosaur.git taskosaur
cd taskosaur
``- 设置环境变量
bash
cp .env.example .env
`
这将创建用于应用的 .env 文件,您可以根据需要自定义数值。
- 使用 Docker Compose 启动
`bash
docker compose -f docker-compose.dev.yml up
`
这将自动执行:
- ✅ 启动 PostgreSQL 和 Redis
- ✅ 安装所有依赖
- ✅ 生成 Prisma 客户端
- ✅ 运行数据库迁移
- ✅ 使用示例数据填充数据库
- ✅ 启动后端和前端
- 访问应用程序
- 前端:http://localhost:3001
- 后端 API:http://localhost:3000
- API 文档:http://localhost:3000/api/docs
详见 DOCKER_DEV_SETUP.md 获取详细的 Docker 文档。手动安装
如果您更喜欢本地运行服务:
- 克隆仓库
`bash
git clone https://github.com/Taskosaur/Taskosaur.git taskosaur
cd taskosaur
`- 安装依赖项
bash
npm install
`- 环境设置
在根目录下创建一个 文件:
`env
# Database Configuration
DATABASE_URL="postgresql://taskosaur:taskosaur@localhost:5432/taskosaur" # Application
NODE_ENV=development
# Authentication & Security
JWT_SECRET="your-jwt-secret-key-change-this"
JWT_REFRESH_SECRET="your-refresh-secret-key-change-this-too"
JWT_EXPIRES_IN="15m"
JWT_REFRESH_EXPIRES_IN="7d"
# Encryption for sensitive data
ENCRYPTION_KEY="your-64-character-hex-encryption-key-change-this-to-random-value"
# Redis Configuration (for Bull Queue)
REDIS_HOST=localhost
REDIS_PORT=6379
REDIS_PASSWORD=
# Email Configuration (optional, for notifications)
SMTP_HOST=smtp.example.com
SMTP_PORT=587
SMTP_USER=your-email@taskosaur.com
SMTP_PASS=your-app-password
SMTP_FROM=noreply@taskosaur.com
EMAIL_DOMAIN="taskosaur.com"
# Frontend URL (for email links and CORS)
FRONTEND_URL=http://localhost:3001
CORS_ORIGIN="http://localhost:3001"
# Backend API URL (for frontend to connect to backend)
NEXT_PUBLIC_API_BASE_URL=http://localhost:3000/api
# File Upload
UPLOAD_DEST="./uploads"
MAX_FILE_SIZE=10485760
# Queue Configuration
MAX_CONCURRENT_JOBS=5
JOB_RETRY_ATTEMPTS=3
`- 设置数据库
bash
# Run database migrations
npm run db:migrate # Seed the database (idempotent - safe to run multiple times)
npm run db:seed
# Or seed with admin user only
npm run db:seed:admin
`- 启动应用程序
bash
# Development mode (runs both frontend and backend)
npm run dev # Or start individually
npm run dev:frontend # Start frontend only (port 3001)
npm run dev:backend # Start backend only (port 3000)
`- 访问应用程序
- 前端: http://localhost:3001
- 后端 API: http://localhost:3000
- API 文档: http://localhost:3000/api/docs
开发
可用命令
所有命令均在根目录下运行:
#### 开发
#### 构建
#### 数据库操作所有种子命令都是幂等的,可以安全地多次运行:
#### 测试
#### 代码质量
#### 清理
bash git commit -m "feat: add feature" # Runs checks automatically--no-verifyGit 钩子
使用 Husky 自动进行代码质量检查:
- 预提交(Pre-commit):在每次提交前运行所有工作区的代码检查工具
- 确保代码质量和一致性
- 可使用
跳过(仅限紧急情况)
项目结构
"Set up a new marketing workspace with Q1 campaign project" "Move all high-priority bugs to in-progress and assign to John" "Create a sprint with tasks from last week's backlog" "Generate a report of Sarah's completed tasks this month" "Set up automated workflow: when task is marked done, create review subtask"`会话式人工智能任务执行设置
通过3个步骤启用会话式人工智能任务执行:
- 导航至组织设置
Go to Settings → Organization Settings → AI Assistant Settings`https://openrouter.ai/api/v1
- 添加您的大型语言模型 API 密钥
- 切换“启用 AI 聊天”至开启状态
- 添加来自任何兼容提供商的 API 密钥:
- OpenRouter(100+ 模型,免费选项):
https://api.openai.com/v1OpenAI(GPT 模型): https://api.anthropic.com/v1Anthropic(Claude 模型): 本地 AI(Ollama 等):您的本地端点 开始使用 AI 进行管理 打开 AI 聊天面板(闪光图标) 输入:_“创建一个名为网站重设计的新项目,包含 5 个任务”_ AI 会自动执行工作流程 会话式 AI 任务执行原理
Taskosaur 的会话式 AI 任务执行功能支持应用内的对话式 AI 任务执行,直接执行操作,而不仅仅是提供建议:
示例会话式 AI 任务执行命令:
- 应用内对话执行 — 自然与 AI 对话,直接在应用内执行任务
- 直接浏览器自动化 — AI 实时导航您的界面并点击按钮
- 复杂工作流执行 — 通过对话无缝处理多步骤操作
- 上下文感知操作 — 理解您当前的项目/工作空间上下文
- 自然语言界面 — 无需记忆命令,只需自然表达
bash`功能
_Taskosaur 正在积极开发中。以下功能代表了我们的计划能力,许多功能已实现,其他正在进行中。_
🤖 会话式 AI 任务执行能力
🎯 应用内会话任务执行
🧠 自然语言处理
- 应用内聊天界面:直接在 Taskosaur 内与 AI 对话以执行任务
- 基于浏览器的任务执行:AI 导航界面,填写表单,实时完成任务
- 多步骤工作流处理:通过单一会话命令执行复杂工作流
- 上下文理解:AI 识别您当前的工作区、项目和团队上下文
- 主动建议:AI 通过对话识别瓶颈并提出改进建议
⚡ 动作执行
- 理解复杂的项目管理请求
- 从对话输入中提取动作、参数和上下文
- 根据当前上下文推断缺失细节
🚀 项目工作流支持
- 实时浏览器自动化
- 批量操作多个任务
- 融入您现有的工作流程
会话式 AI 任务执行示例:
- 迭代计划与任务分析
- 根据团队容量分配任务
- 项目时间线预测
- “设置第一季度市场活动:创建工作区,添加团队,使用标准模板设置3个项目”
- “分析所有逾期任务,并根据团队容量和优先级重新安排”
- “创建自动化工作流:高优先级缺陷 → 分配给高级开发 → 通知团队负责人”
- “生成迭代回顾报告,包含团队速度分析和改进建议”
- “将所有设计任务从旧项目迁移到新工作区并更新分配”
组织管理
- 多租户架构:计划支持多个组织,数据隔离
- 工作区组织:在工作区内分组项目以便更好管理
- 基于角色的访问控制:实现细粒度权限(管理员、经理、成员、查看者)
- 团队管理:邀请并管理跨组织团队成员
项目管理
- 灵活的项目结构:创建和管理带有自定义工作流的项目
- 冲刺规划:计划中的敏捷冲刺管理,包含规划和跟踪
- 任务依赖:处理任务之间的多种依赖关系
- 自定义工作流:为不同项目需求实现自定义状态工作流
任务管理
- 丰富的任务类型:支持任务、缺陷、史诗、故事和子任务
- 优先级管理:设置任务优先级,从最低到最高
- 自定义字段:添加自定义字段以捕获项目特定数据
- 标签与标记:使用可定制标签组织任务
- 时间跟踪:详细记录任务花费时间
- 文件附件:向任务附加文件和文档
- 评论与提及:通过任务评论协作并使用@提及
- 任务关注者:订阅任务更新和通知
多种视图
- 看板:通过拖放实现可视化任务管理
- 日历视图:计划日程和时间线可视化
- 甘特图:项目时间线和依赖关系的可视化(计划中)
- 列表视图:传统的表格任务列表
- 分析仪表板:致力于项目指标、燃尽图和团队速度
自动化与集成
- 自动化规则:计划中的自定义自动化工作流
- 邮件通知:任务更新的自动邮件提醒
- 实时更新:使用WebSocket连接实现实时更新
- 活动日志:全面的所有变更审计追踪
- 搜索功能:致力于实现跨项目和任务的全局搜索
分析与报告
- 冲刺燃尽图:计划的冲刺进度跟踪
- 团队速度:计划的团队绩效随时间监控
- 任务分布:致力于任务分配和工作负载分析
- 自定义报告:计划的项目特定报告生成
快速开始
前提条件
- Node.js 22+ 和 npm
- PostgreSQL 13+
- Redis 6+(用于后台作业)
安装
- 克隆仓库
bash git clone https://github.com/Taskosaur/Taskosaur.git taskosaur cd taskosaur``
- 安装依赖项
bash npm install`.env这将自动:
在根目录下创建一个
- 安装所有工作区依赖项(前端和后端)
- 设置 Husky git 钩子以保证代码质量
- 环境设置
文件,内容如下:`
env # Database Configuration DATABASE_URL="postgresql://your-db-username:your-db-password@localhost:5432/taskosaur"`# Authentication JWT_SECRET="your-jwt-secret-key-change-this" JWT_REFRESH_SECRET="your-refresh-secret-key-change-this-too" JWT_EXPIRES_IN="15m" JWT_REFRESH_EXPIRES_IN="7d"
# Redis Configuration (for Bull Queue) REDIS_HOST=localhost REDIS_PORT=6379 REDIS_PASSWORD=
# Email Configuration (for notifications) SMTP_HOST=smtp.gmail.com SMTP_PORT=587 SMTP_USER=your-email@gmail.com SMTP_PASS=your-app-password SMTP_FROM=noreply@taskosaur.com
# Frontend URL (for email links) FRONTEND_URL=http://localhost:3000
# File Upload UPLOAD_DEST="./uploads" MAX_FILE_SIZE=10485760
# Queue Configuration MAX_CONCURRENT_JOBS=5 JOB_RETRY_ATTEMPTS=3
# Frontend Configuration NEXT_PUBLIC_API_BASE_URL=http://localhost:3001/api
`
- 设置数据库
bash # Run database migrations npm run db:migrate`# Seed the database with core data npm run db:seed
`
- 启动应用程序
bash # Development mode (with hot reload for both frontend and backend) npm run dev`# Or start individually npm run dev:frontend # Start frontend only npm run dev:backend # Start backend only
.env
- 访问应用程序
- 前端: http://localhost:3000
- 后端 API: http://localhost:3001/api
- API 文档: http://localhost:3001/api/docs
开发
可用命令
所有命令均在根目录下运行。环境变量会自动从根目录的
文件加载。#### 开发
Start both frontend and backend
npm run devStart individually
npm run dev:frontend # Start frontend dev server npm run dev:backend # Start backend dev server with hot reload
#### 构建
Build all workspaces
npm run buildBuild individually
npm run build:frontend # Build frontend for production npm run build:backend # Build backend for production npm run build:dist # Build complete distribution package
#### 数据库操作
#### 测试
#### 代码质量
#### 清理
代码质量与 Git 钩子
使用 Prettier、ESLint 和 Husky 实现自动代码格式化和代码检查。
Lint all workspaces
npm run lint # Lint all workspacesLint individually
npm run lint:frontend # Frontend only npm run lint:backend # Backend onlyFormat backend code
npm run format # Format backend code with Prettier
预提交钩子:通过 Husky 在每次提交时自动格式化、检查和验证代码。
Commits run checks automatically
git commit -m "feat: add feature"Bypass checks in emergencies only
git commit -m "fix: urgent hotfix" --no-verify
项目结构
部署
生产部署
#### 使用 Docker(推荐)
Clone the repository
git clone https://github.com/Taskosaur/Taskosaur.git taskosaur cd taskosaurSetup environment variables
cp .env.example .envbash⚠️ 重要提示: 编辑.env并使用安全的生产环境值进行更新:JWT_SECRET
- 为
、JWT_REFRESH_SECRET、ENCRYPTION_KEY生成强且唯一的密钥FRONTEND_URL设置安全的数据库凭据 配置您的域名 URL( 、CORS_ORIGIN、NEXT_PUBLIC_API_BASE_URL)配置用于邮件通知的 SMTP 设置 切勿在生产环境中使用示例/默认值
Build and run with Docker Compose
docker-compose -f docker-compose.prod.yml up -d
#### 手动部署生产环境先决条件:
- Node.js 22+ LTS
- PostgreSQL 13+
- Redis 6+
- 反向代理(推荐使用 Nginx)
部署步骤:
From root directory
npm installRun database migrations
npm run db:migrate:deployGenerate Prisma client
npm run db:generateBuild distribution package
npm run build:distStart the application
Backend: dist/main.js
Frontend: dist/public/
Serve with your preferred Node.js process manager (PM2, systemd, etc.)
env NODE_ENV=production#### 生产环境变量.env更新你的
文件以适应生产环境:
Database Configuration
DATABASE_URL="postgresql://username:password@your-db-host:5432/taskosaur"Authentication
JWT_SECRET="your-secure-production-jwt-secret" JWT_REFRESH_SECRET="your-secure-production-refresh-secret"Redis Configuration
REDIS_HOST="your-redis-host" REDIS_PORT=6379 REDIS_PASSWORD="your-redis-password"CORS Configuration
CORS_ORIGIN="https://your-domain.com"Frontend Configuration
NEXT_PUBLIC_API_BASE_URL=https://api.your-domain.com/api FRONTEND_URL=https://your-domain.com `#### 托管平台
推荐平台:
- 后端:Railway,Render,DigitalOcean 应用平台
- 前端:Vercel,Netlify,Railway
- 数据库:Railway PostgreSQL,Supabase,AWS RDS
- Redis:Railway Redis,Redis Cloud,AWS ElastiCache
API 文档
API 文档通过 Swagger 自动生成:
- 开发环境:http://localhost:3000/api/docs
- 生产环境:
贡献
欢迎贡献!详情请参阅我们的贡献指南。
- Fork 仓库
- 创建功能分支(
)
提交更改(
git commit -m 'feat: add amazing feature')
推送分支( git push origin feature/amazing-feature`)
开发指南
- 代码风格:遵循现有代码风格,提交时自动运行代码检查工具
- TypeScript:使用严格的 TypeScript 并添加适当的类型注释
- 测试:为新功能和漏洞修复编写测试
- 文档:更新任何 API 变更的文档
- 提交信息:使用规范的提交信息(feat,fix,docs 等)
许可证
本项目采用商业源代码许可协议,详情请见 LICENSE 文件。
致谢
- NestJS - 后端框架
- Next.js - 前端框架
- Prisma - 数据库 ORM
- Tailwind CSS - CSS 框架
支持
- 邮箱: support@taskosaur.com
- Discord: 加入我们的社区
- 问题反馈: GitHub Issues
- 讨论区: GitHub Discussions
由 Taskosaur 团队倾情打造
--- Tranlated By Open Ai Tx | Last indexed: 2026-02-13 ---