Taskosaur
![]()
대화형 AI 작업 실행을 통한 오픈 소스 프로젝트 관리
📹 Taskosaur 작동 영상 보기
클릭하여 보기: Taskosaur에서 대화형 AI 작업 실행이 어떻게 작동하는지 확인하세요
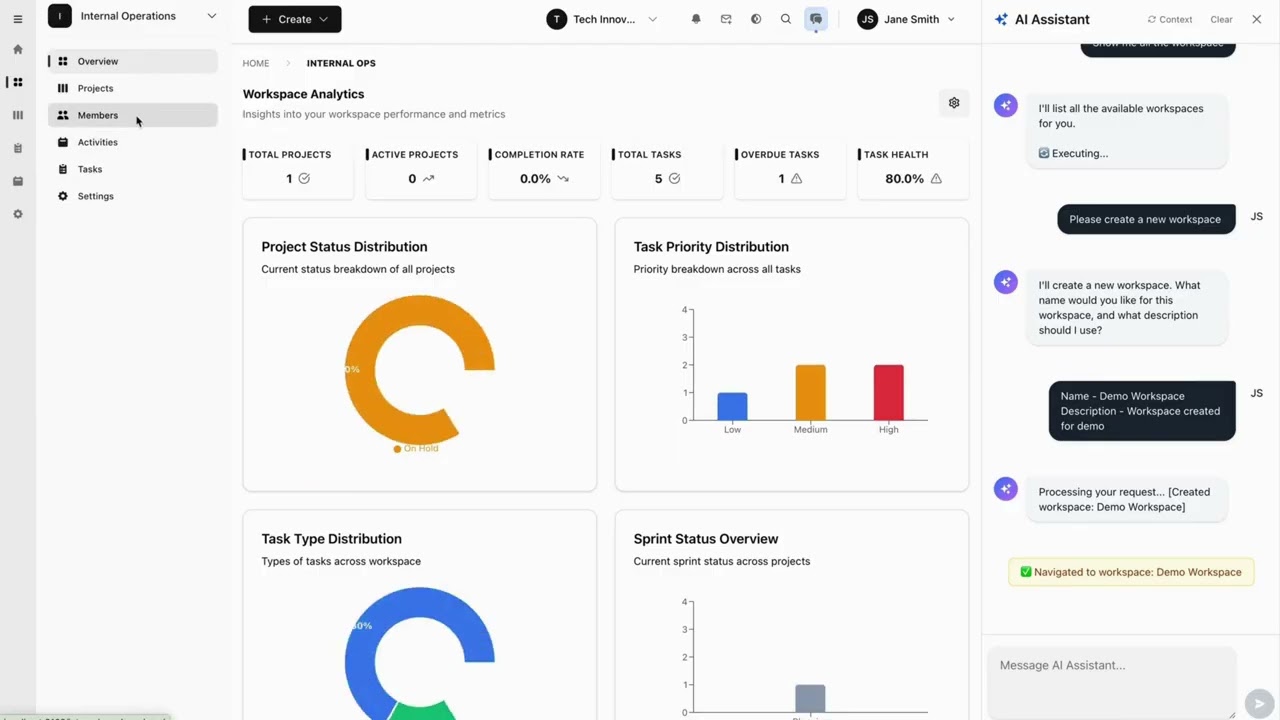
Taskosaur는 앱 내 작업 실행을 위한 대화형 AI를 갖춘 오픈 소스 프로젝트 관리 플랫폼입니다. AI 어시스턴트는 자연스러운 대화를 통해 작업 생성부터 워크플로우 관리까지 프로젝트 관리 업무를 직접 애플리케이션 내에서 처리합니다.
![]()
![]()
![]()
![]()
![]()
![]()
![]()
Taskosaur는 전통적인 프로젝트 관리 기능과 대화형 AI 작업 실행을 결합하여 자연스러운 대화로 프로젝트를 관리할 수 있게 합니다. 메뉴와 양식을 탐색하는 대신, 필요한 작업을 설명하기만 하면 작업 생성, 업무 할당, 워크플로우 관리를 할 수 있습니다.
주요 기능
- 🤖 대화형 AI 작업 실행 - 앱 내에서 자연스러운 대화를 통해 프로젝트 작업을 실행
- 💬 자연어 명령어 - "지난주 고우선순위 버그로 스프린트 생성" 명령을 자동 실행
- 🏠 셀프 호스팅 - 데이터가 사용자의 인프라에 안전하게 보관
- 💰 자체 LLM 사용 가능 - OpenAI, Anthropic, OpenRouter 또는 로컬 모델 API 키 사용 가능
- 🔧 앱 내 브라우저 자동화 - AI가 인터페이스를 탐색하고 앱 내에서 직접 작업 수행
- 📊 완전한 프로젝트 관리 - 칸반 보드, 스프린트, 작업 의존성, 시간 추적
- 🌐 오픈 소스 - 비즈니스 소스 라이선스(BSL) 하에 제공
목차
빠른 시작
필수 조건
- Node.js 22+ 및 npm 10+
- PostgreSQL 16+ (또는 도커)
- Redis 7+ (또는 도커)
도커 설정 (권장)
Taskosaur를 가장 빠르게 시작하는 방법은 Docker Compose를 사용하는 것입니다:
- 저장소 복제하기
git clone https://github.com/Taskosaur/Taskosaur.git taskosaur
cd taskosaur
``
- 환경 변수 설정
`bash
cp .env.example .env
`
이것은 앱에서 사용하는 .env 파일을 생성하며, 필요에 따라 값을 사용자 정의할 수 있습니다.
- Docker Compose로 시작하기
`bash
docker compose -f docker-compose.dev.yml up
`
이 작업을 자동으로 수행합니다:
- ✅ PostgreSQL과 Redis 시작
- ✅ 모든 의존성 설치
- ✅ Prisma 클라이언트 생성
- ✅ 데이터베이스 마이그레이션 실행
- ✅ 샘플 데이터로 데이터베이스 시드
- ✅ 백엔드와 프론트엔드 모두 시작
- 애플리케이션 접속
- 프론트엔드: http://localhost:3001
- 백엔드 API: http://localhost:3000
- API 문서: http://localhost:3000/api/docs
자세한 Docker 문서는 DOCKER_DEV_SETUP.md를 참조하세요.수동 설정
로컬에서 서비스를 실행하려면:
- 저장소 클론
`bash
git clone https://github.com/Taskosaur/Taskosaur.git taskosaur
cd taskosaur
`- 종속성 설치
bash
npm install
`
- 환경 설정
루트 디렉토리에 .env 파일을 생성하세요:
`env
# Database Configuration
DATABASE_URL="postgresql://taskosaur:taskosaur@localhost:5432/taskosaur" # Application
NODE_ENV=development
# Authentication & Security
JWT_SECRET="your-jwt-secret-key-change-this"
JWT_REFRESH_SECRET="your-refresh-secret-key-change-this-too"
JWT_EXPIRES_IN="15m"
JWT_REFRESH_EXPIRES_IN="7d"
# Encryption for sensitive data
ENCRYPTION_KEY="your-64-character-hex-encryption-key-change-this-to-random-value"
# Redis Configuration (for Bull Queue)
REDIS_HOST=localhost
REDIS_PORT=6379
REDIS_PASSWORD=
# Email Configuration (optional, for notifications)
SMTP_HOST=smtp.example.com
SMTP_PORT=587
SMTP_USER=your-email@taskosaur.com
SMTP_PASS=your-app-password
SMTP_FROM=noreply@taskosaur.com
EMAIL_DOMAIN="taskosaur.com"
# Frontend URL (for email links and CORS)
FRONTEND_URL=http://localhost:3001
CORS_ORIGIN="http://localhost:3001"
# Backend API URL (for frontend to connect to backend)
NEXT_PUBLIC_API_BASE_URL=http://localhost:3000/api
# File Upload
UPLOAD_DEST="./uploads"
MAX_FILE_SIZE=10485760
# Queue Configuration
MAX_CONCURRENT_JOBS=5
JOB_RETRY_ATTEMPTS=3
`
- 데이터베이스 설정
`bash
# Run database migrations
npm run db:migrate # Seed the database (idempotent - safe to run multiple times)
npm run db:seed
# Or seed with admin user only
npm run db:seed:admin
`- 애플리케이션 시작하기
bash
# Development mode (runs both frontend and backend)
npm run dev # Or start individually
npm run dev:frontend # Start frontend only (port 3001)
npm run dev:backend # Start backend only (port 3000)
`
- 애플리케이션 접속
- 프론트엔드: http://localhost:3001
- 백엔드 API: http://localhost:3000
- API 문서: http://localhost:3000/api/docs
개발
사용 가능한 명령어
모든 명령어는 루트 디렉토리에서 실행됩니다:
#### 개발
#### 빌드
#### 데이터베이스 작업모든 시드 명령은 멱등성(idempotent)을 가지며 여러 번 실행해도 안전합니다:
#### 테스트
#### 코드 품질
#### 정리 작업
bash git commit -m "feat: add feature" # Runs checks automatically--no-verifyGit 후크
Husky를 사용한 자동 코드 품질 검사:
- Pre-commit: 커밋 전 모든 작업 공간에서 린터 실행
- 코드 품질과 일관성 보장
로 우회 가능 (긴급 상황에만)
프로젝트 구조
"Set up a new marketing workspace with Q1 campaign project" "Move all high-priority bugs to in-progress and assign to John" "Create a sprint with tasks from last week's backlog" "Generate a report of Sarah's completed tasks this month" "Set up automated workflow: when task is marked done, create review subtask"`대화형 AI 작업 실행 설정
3단계로 대화형 AI 작업 실행 활성화:
- 조직 설정으로 이동
Go to Settings → Organization Settings → AI Assistant Settings`https://openrouter.ai/api/v1
- LLM API 키 추가하기
- "AI 채팅 활성화"를 ON으로 전환
- 호환 가능한 제공업체에서 API 키 추가:
- OpenRouter (100개 이상 모델, 무료 옵션):
https://api.openai.com/v1OpenAI (GPT 모델): https://api.anthropic.com/v1Anthropic (Claude 모델): Local AI (Ollama 등): 로컬 엔드포인트 AI로 관리 시작하기 AI 채팅 패널 열기 (반짝임 아이콘) 입력: _"Website Redesign이라는 새 프로젝트를 5개의 작업과 함께 생성해줘"_ AI가 워크플로우를 자동으로 실행 대화형 AI 작업 실행 방식
Taskosaur의 대화형 AI 작업 실행 기능은 앱 내에서 작업 실행을 위해 대화형 AI를 사용하며, 단순한 제안 제공이 아닌 직접 작업을 수행합니다:
대화형 AI 작업 실행 명령 예시:
- 앱 내 대화형 실행 - AI와 자연스럽게 대화하며 앱 내에서 직접 작업 실행
- 직접 브라우저 자동화 - AI가 인터페이스를 탐색하고 실시간으로 버튼 클릭
- 복잡한 워크플로우 실행 - 다단계 작업을 대화로 원활히 처리
- 컨텍스트 인지 작업 - 현재 프로젝트/작업 공간 컨텍스트 이해
- 자연어 인터페이스 - 명령어를 외울 필요 없이 자연스럽게 말하기
bash## 기능`_Taskosaur는 활발히 개발 중입니다. 다음 기능들은 계획된 역량을 나타내며, 그중 다수는 이미 구현되었고 나머지는 진행 중입니다._
🤖 대화형 AI 작업 실행 기능
🎯 앱 내 대화형 작업 실행
🧠 자연어 처리
- 앱 내 채팅 인터페이스: Taskosaur 내에서 AI와 직접 대화하며 작업 실행
- 브라우저 기반 작업 실행: AI가 인터페이스를 탐색하고, 양식을 작성하며, 실시간으로 작업 완료
- 다단계 워크플로우 처리: 단일 대화 명령으로 복잡한 워크플로우 실행
- 컨텍스트 이해: AI가 현재 작업 공간, 프로젝트, 팀 컨텍스트를 인식
- 선제적 제안: AI가 병목 현상을 파악하고 대화를 통해 개선사항 제안
⚡ 작업 실행
- 복잡한 프로젝트 관리 요청 이해
- 대화 입력에서 작업, 매개변수, 컨텍스트 추출
- 현재 컨텍스트에서 누락된 세부 사항 추론
🚀 프로젝트 워크플로우 지원
- 실시간 라이브 브라우저 자동화
- 여러 작업에 대한 일괄 처리
- 기존 워크플로우 내에서 작동
대화형 AI 작업 실행 예시:
- 스프린트 계획 및 작업 분석
- 팀 용량 기반 작업 할당
- 프로젝트 일정 예측
- "1분기 마케팅 캠페인 설정: 작업 공간 생성, 팀 추가, 표준 템플릿으로 3개 프로젝트 설정"
- "모든 연체 작업 분석 및 팀 용량과 우선순위에 따라 일정 재조정"
- "자동화 워크플로우 생성: 고우선순위 버그 → 시니어 개발자에게 할당 → 팀 리드에게 알림"
- "팀 속도 분석 및 개선 제안을 포함한 스프린트 회고 생성"
- "기존 프로젝트의 모든 디자인 작업을 새 작업 공간으로 이전하고 할당 업데이트"
조직 관리
- 멀티 테넌트 아키텍처: 격리된 데이터로 여러 조직 지원 예정
- 워크스페이스 조직: 더 나은 조직을 위해 워크스페이스 내 프로젝트 그룹화
- 역할 기반 접근 제어: 세분화된 권한 구현 (관리자, 매니저, 멤버, 뷰어)
- 팀 관리: 조직 간 팀원 초대 및 관리
프로젝트 관리
- 유연한 프로젝트 구조: 맞춤형 워크플로우로 프로젝트 생성 및 관리
- 스프린트 계획: 계획 및 추적이 가능한 애자일 스프린트 관리 예정
- 작업 의존성: 다양한 의존성 유형을 통한 작업 간 관계 작업 중
- 맞춤형 워크플로우: 다양한 프로젝트 요구에 맞는 상태 워크플로우 구현
작업 관리
- 풍부한 작업 유형: 작업, 버그, 에픽, 스토리, 하위 작업 지원
- 우선순위 관리: 최저에서 최고까지 작업 우선순위 설정
- 사용자 정의 필드: 프로젝트별 데이터를 캡처할 사용자 정의 필드 추가
- 레이블 및 태그: 맞춤형 레이블로 작업 조직화
- 시간 추적: 상세 로그와 함께 작업에 소요된 시간 추적
- 파일 첨부: 작업에 파일 및 문서 첨부
- 댓글 및 멘션: @멘션을 통한 작업 댓글 협업
- 작업 구독자: 작업 업데이트 및 알림 구독
다양한 뷰
- 칸반 보드: 드래그 앤 드롭이 가능한 시각적 작업 관리
- 캘린더 뷰: 예정된 일정 및 타임라인 시각화
- 간트 차트: 예정된 프로젝트 타임라인 및 의존성 시각화
- 목록 뷰: 전통적인 표 기반 작업 목록
- 분석 대시보드: 프로젝트 지표, 소진 차트, 팀 속도 작업 중
자동화 및 통합
- 자동화 규칙: 맞춤형 자동화 워크플로우 예정
- 이메일 알림: 작업 업데이트에 대한 자동 이메일 알림
- 실시간 업데이트: WebSocket 연결을 통한 실시간 업데이트
- 활동 로그: 모든 변경 사항에 대한 종합 감사 추적
- 검색 기능: 프로젝트 및 작업 전반에 걸친 글로벌 검색 작업 중
분석 및 보고
- 스프린트 번다운 차트: 계획된 스프린트 진행 상황 추적
- 팀 속도: 시간 경과에 따른 팀 성과 모니터링 계획
- 작업 분배: 작업 할당 및 작업 부하 분석 작업 중
- 맞춤 보고서: 프로젝트별 맞춤 보고서 생성 계획
빠른 시작
사전 준비 사항
- Node.js 22+ 및 npm
- PostgreSQL 13+
- Redis 6+ (백그라운드 작업용)
설치
- 리포지토리 클론
bash git clone https://github.com/Taskosaur/Taskosaur.git taskosaur cd taskosaur``
- 종속성 설치
bash npm install`이 작업은 자동으로 다음을 수행합니다:.env루트 디렉토리에 다음 구성을 포함한
- 모든 작업 공간 종속성(프론트엔드 및 백엔드) 설치
- 코드 품질을 위한 Husky git 훅 설정
- 환경 설정
파일을 생성하세요:`
env # Database Configuration DATABASE_URL="postgresql://your-db-username:your-db-password@localhost:5432/taskosaur"`# Authentication JWT_SECRET="your-jwt-secret-key-change-this" JWT_REFRESH_SECRET="your-refresh-secret-key-change-this-too" JWT_EXPIRES_IN="15m" JWT_REFRESH_EXPIRES_IN="7d"
# Redis Configuration (for Bull Queue) REDIS_HOST=localhost REDIS_PORT=6379 REDIS_PASSWORD=
# Email Configuration (for notifications) SMTP_HOST=smtp.gmail.com SMTP_PORT=587 SMTP_USER=your-email@gmail.com SMTP_PASS=your-app-password SMTP_FROM=noreply@taskosaur.com
# Frontend URL (for email links) FRONTEND_URL=http://localhost:3000
# File Upload UPLOAD_DEST="./uploads" MAX_FILE_SIZE=10485760
# Queue Configuration MAX_CONCURRENT_JOBS=5 JOB_RETRY_ATTEMPTS=3
# Frontend Configuration NEXT_PUBLIC_API_BASE_URL=http://localhost:3001/api
`
- 데이터베이스 설정
bash # Run database migrations npm run db:migrate`# Seed the database with core data npm run db:seed
`
- 애플리케이션 시작하기
bash # Development mode (with hot reload for both frontend and backend) npm run dev`# Or start individually npm run dev:frontend # Start frontend only npm run dev:backend # Start backend only
.env
- 애플리케이션 접속
- 프론트엔드: http://localhost:3000
- 백엔드 API: http://localhost:3001/api
- API 문서: http://localhost:3001/api/docs
개발
사용 가능한 명령어
모든 명령어는 루트 디렉토리에서 실행됩니다. 환경 변수는 루트
파일에서 자동으로 로드됩니다.#### 개발
Start both frontend and backend
npm run devStart individually
npm run dev:frontend # Start frontend dev server npm run dev:backend # Start backend dev server with hot reload
#### 빌드
Build all workspaces
npm run buildBuild individually
npm run build:frontend # Build frontend for production npm run build:backend # Build backend for production npm run build:dist # Build complete distribution package
#### 데이터베이스 작업
#### 테스트
#### 코드 품질
#### 정리 작업
코드 품질 및 Git 후크
Prettier, ESLint, 및 Husky를 사용한 자동 코드 포매팅 및 린팅.
Lint all workspaces
npm run lint # Lint all workspacesLint individually
npm run lint:frontend # Frontend only npm run lint:backend # Backend onlyFormat backend code
npm run format # Format backend code with Prettier
사전 커밋 훅: Husky를 통해 커밋 시마다 코드를 자동으로 포맷, 린트 및 검증합니다.
Commits run checks automatically
git commit -m "feat: add feature"Bypass checks in emergencies only
git commit -m "fix: urgent hotfix" --no-verify
프로젝트 구조
배포
프로덕션 배포
#### 도커 사용 (권장)
Clone the repository
git clone https://github.com/Taskosaur/Taskosaur.git taskosaur cd taskosaurSetup environment variables
cp .env.example .envbash⚠️ 중요:.env파일을 편집하고 보안이 강화된 프로덕션 값을 업데이트하세요:JWT_SECRET,JWT_REFRESH_SECRET,ENCRYPTION_KEY에 대해 강력하고 고유한 비밀 키를 생성하세요FRONTEND_URL보안 데이터베이스 자격 증명을 설정하세요 도메인 URL을 구성하세요 ( ,CORS_ORIGIN,NEXT_PUBLIC_API_BASE_URL)이메일 알림을 위한 SMTP 설정을 구성하세요 프로덕션 환경에서는 예제/기본 값을 절대 사용하지 마세요
Build and run with Docker Compose
docker-compose -f docker-compose.prod.yml up -d
#### 수동 배포프로덕션 전제 조건:
- Node.js 22+ LTS
- PostgreSQL 13+
- Redis 6+
- 리버스 프록시 (Nginx 권장)
배포 단계:
From root directory
npm installRun database migrations
npm run db:migrate:deployGenerate Prisma client
npm run db:generateBuild distribution package
npm run build:distStart the application
Backend: dist/main.js
Frontend: dist/public/
Serve with your preferred Node.js process manager (PM2, systemd, etc.)
env NODE_ENV=production#### 프로덕션 환경 변수.env프로덕션용
파일을 업데이트하세요:
Database Configuration
DATABASE_URL="postgresql://username:password@your-db-host:5432/taskosaur"Authentication
JWT_SECRET="your-secure-production-jwt-secret" JWT_REFRESH_SECRET="your-secure-production-refresh-secret"Redis Configuration
REDIS_HOST="your-redis-host" REDIS_PORT=6379 REDIS_PASSWORD="your-redis-password"CORS Configuration
CORS_ORIGIN="https://your-domain.com"Frontend Configuration
NEXT_PUBLIC_API_BASE_URL=https://api.your-domain.com/api FRONTEND_URL=https://your-domain.com `
#### 호스팅 플랫폼추천 플랫폼:
- 백엔드: Railway, Render, DigitalOcean App Platform
- 프론트엔드: Vercel, Netlify, Railway
- 데이터베이스: Railway PostgreSQL, Supabase, AWS RDS
- Redis: Railway Redis, Redis Cloud, AWS ElastiCache
API 문서
API 문서는 Swagger를 사용하여 자동 생성됩니다:
- 개발: http://localhost:3000/api/docs
- 운영:
https://api.your-domain.com/api/docs기여하기
기여를 환영합니다! 자세한 내용은 기여 가이드라인을 참조하세요.
- 저장소를 포크하세요
- 기능 브랜치 생성 (
)
변경사항 커밋 (
git commit -m 'feat: add amazing feature')
브랜치에 푸시 ( git push origin feature/amazing-feature`)
개발 가이드라인
- 코드 스타일: 기존 코드 스타일을 따르며, 커밋 시 린터가 자동 실행됩니다
- TypeScript: 엄격한 TypeScript와 적절한 타입 주석을 사용하세요
- 테스트: 새로운 기능 및 버그 수정에 대한 테스트를 작성하세요
- 문서화: API 변경사항에 대한 문서를 업데이트하세요
- 커밋 메시지: 관례적인 커밋 메시지 사용 (feat, fix, docs 등)
라이선스
이 프로젝트는 Business Source License 하에 라이선스가 부여됩니다 - 자세한 내용은 LICENSE 파일을 참조하세요.
감사의 글
- NestJS - 백엔드 프레임워크
- Next.js - 프론트엔드 프레임워크
- Prisma - 데이터베이스 ORM
- Tailwind CSS - CSS 프레임워크
지원
---Taskosaur 팀이 사랑을 담아 만들었습니다
--- Tranlated By Open Ai Tx | Last indexed: 2026-02-13 ---