OCI2Git
[![]() ][documentation]
][documentation]


[//]: # (mock for future test.yaml) [//]: # ([](https://github.com/Virviil/oci2git/actions))
এটা Rust এপ্লিকেচন যি কণ্টেইনাৰ ইমেজ (Docker, আদি) গিট ৰেপজিটৰিত ৰূপান্তৰ কৰে, আৰু YAML ফৰ্মেটত ফাইল ছিষ্টেম বিল অফ মেটেৰিয়েলছ (fsbom) নিৰ্মাণ কৰে। প্ৰতিটো কণ্টেইনাৰ স্তৰ গিট কমিট হিচাপে উপস্থাপন কৰা হয়, মূল ইমেজৰ ইতিহাস আৰু গঠন সংৰক্ষণ কৰি।

বৈশিষ্ট্যসমূহ
- Docker ইমেজ বিশ্লেষণ আৰু স্তৰৰ তথ্য আহৰণ
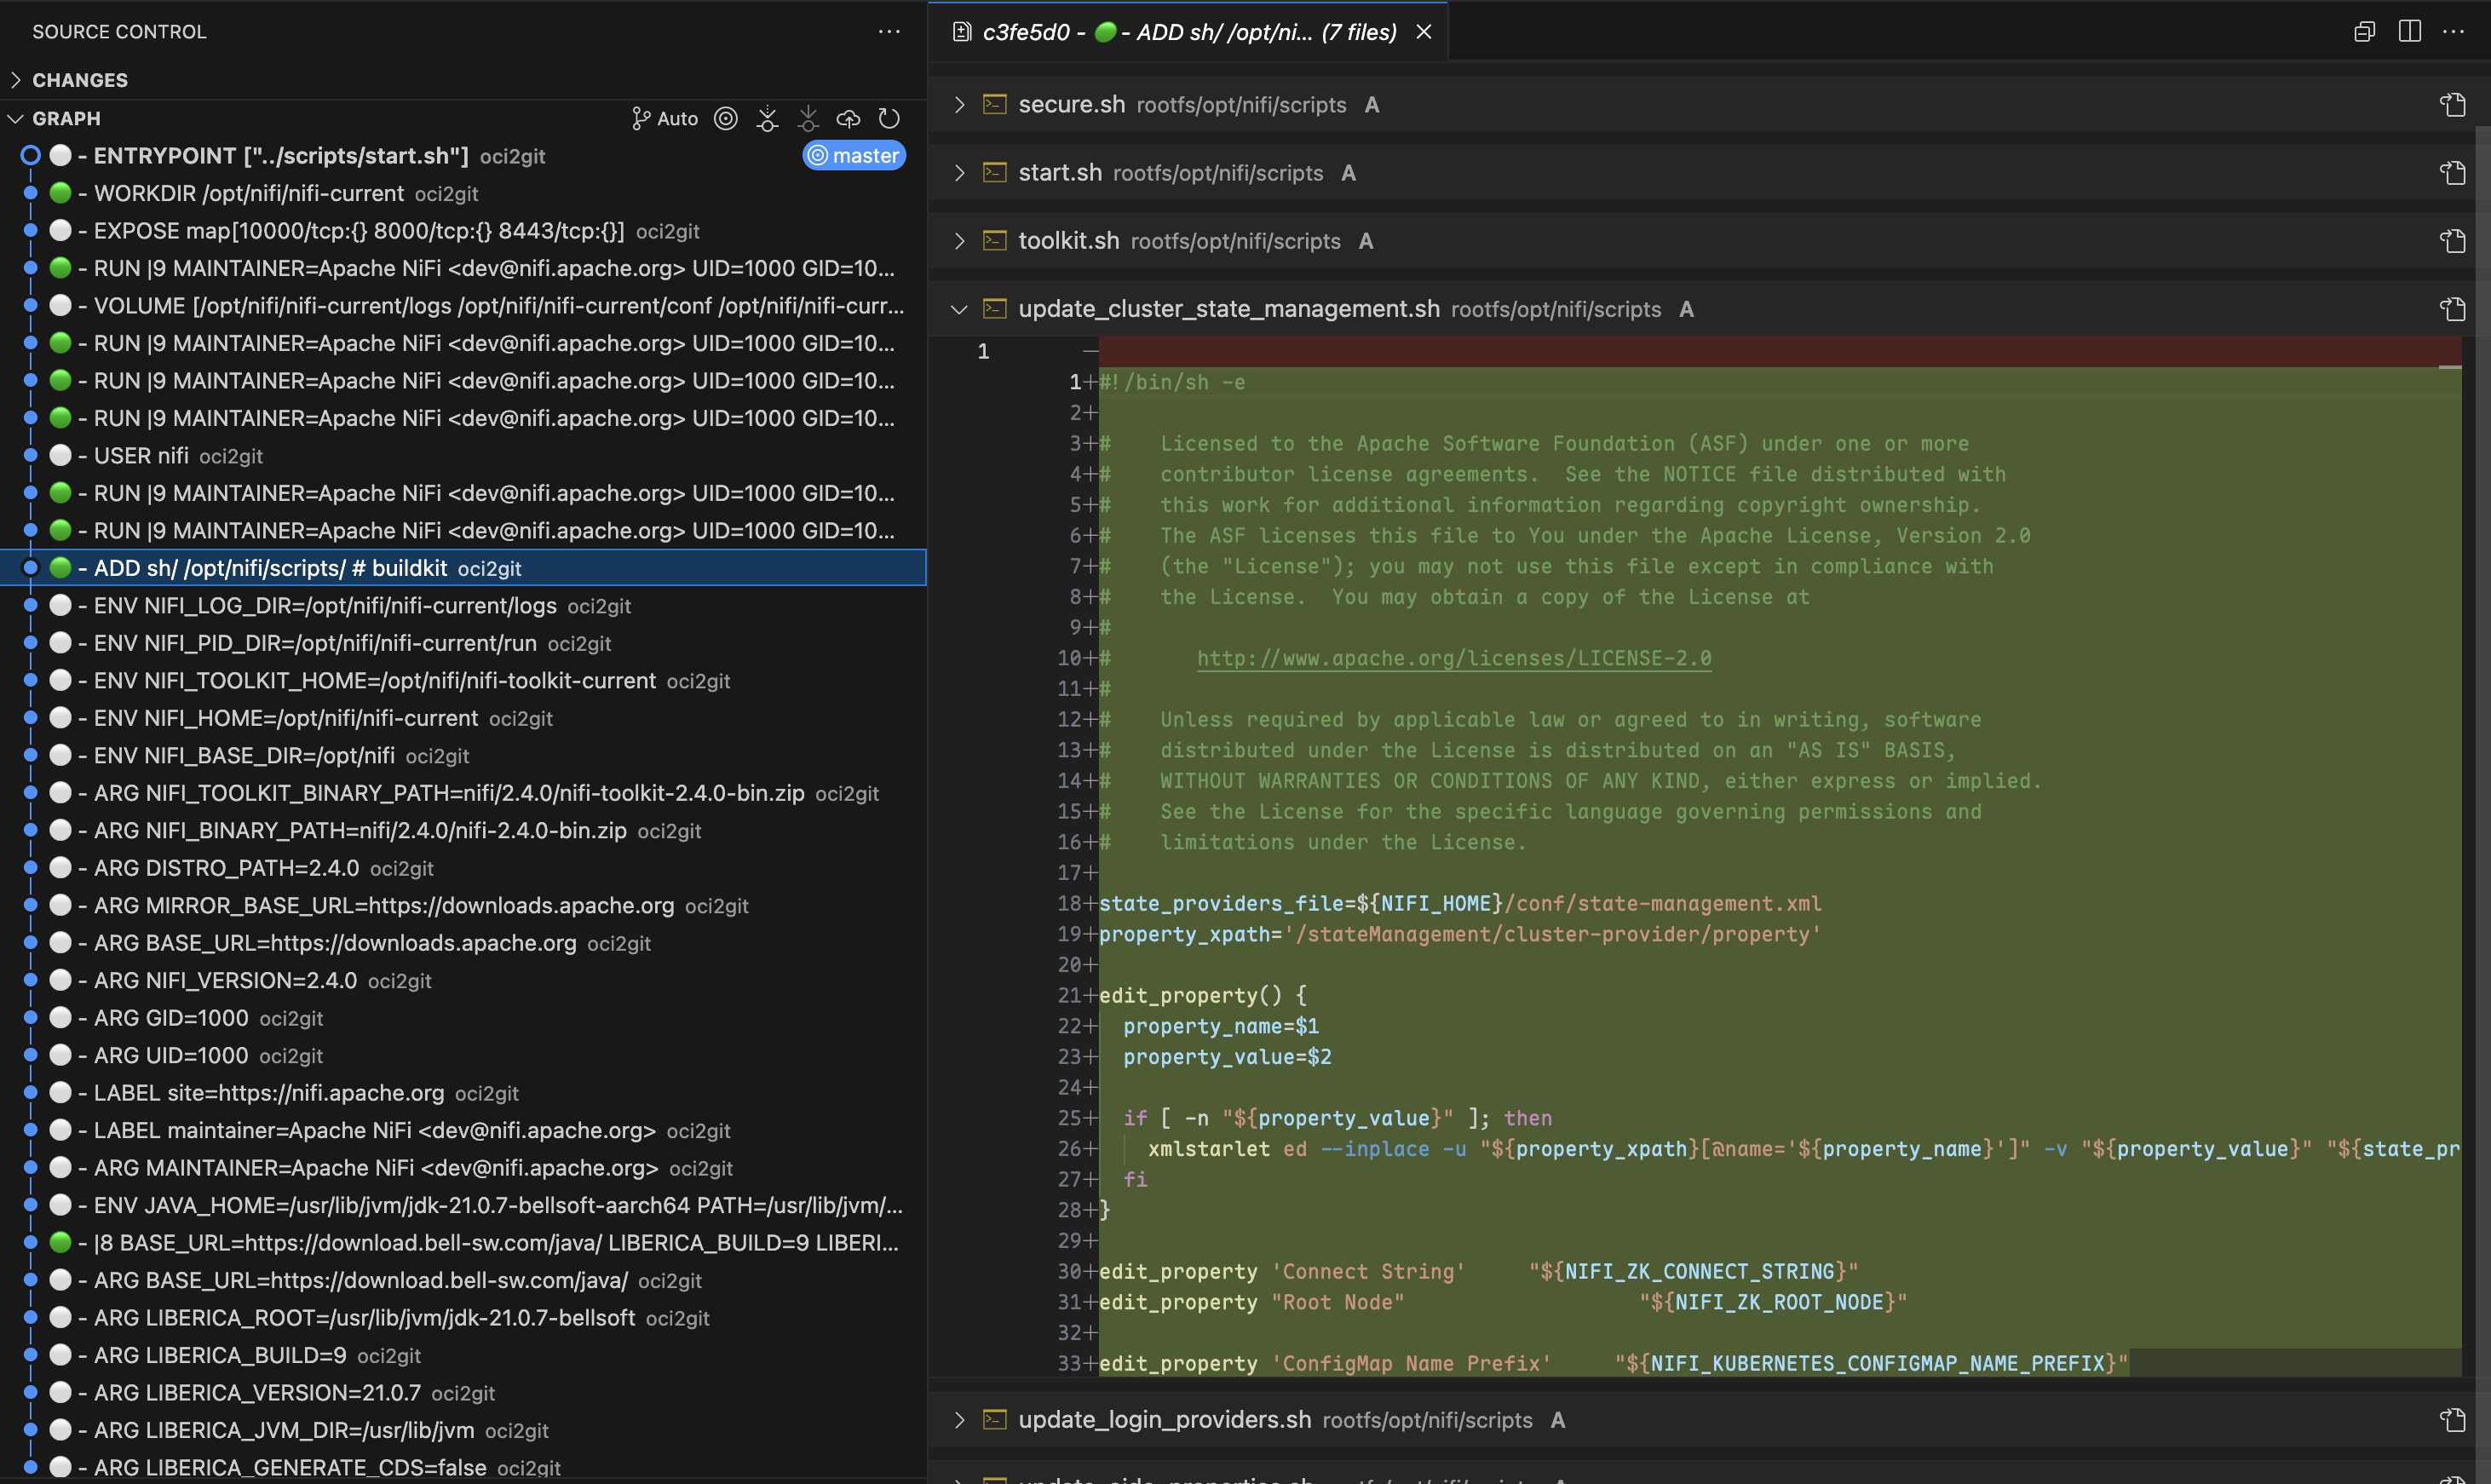
- গিট ৰেপজিটৰি নিৰ্মাণ, য’ত প্ৰতিটো ইমেজ স্তৰ এটা কমিট হিচাপে দেখুওৱা হয়
- প্ৰতিটো স্তৰৰ ফাইল তালিকাৰ সৈতে YAML ফাইল ছিষ্টেম বিল অফ মেটেৰিয়েলছ (fsbom) তৈয়াৰ কৰক
- খালী স্তৰৰ (ENV, WORKDIR, আদি) সমৰ্থন খালী কমিট হিচাপে
- সম্পূৰ্ণ মেটাডাটা Markdown ফৰ্মেটলৈ আহৰণ
- বিভিন্ন কণ্টেইনাৰ ইঞ্জিনৰ সমৰ্থনৰ বাবে বঢ়াব পৰা আৰ্হি
ব্যৱহাৰ ক্ষেত্ৰসমূহ
স্তৰ তুলনা (Layer Diffing)
কণ্টেইনাৰ সমস্যা সমাধান কৰাৰ সময়ত, Git ৰ শক্তিশালী diffing সক্ষমতা ব্যৱহাৰ কৰি যিকোনো দুইটা স্তৰৰ মাজত ঠিক কি পৰিৱর্তন ঘটিছে চাব পাৰি।git diff চলাই ইঞ্জিনিয়াৰসকলে কোন ফাইল যোগ, সংশোধন বা ডিলিট হৈছে সঠিকভাৱে চাব পাৰে, যাৰ ফলত প্ৰতিটো Dockerfile নিৰ্দেশনাৰ প্ৰভাৱ বুজা আৰু সমস্যাসকল চিনাক্ত কৰা সহজ হয়।
উৎস অনুসৰণ (Origin Tracking)
git blame ব্যৱহাৰ কৰি, ডেভেলপাৰসকলে কেতিয়া বিশেষ ফাইল বা কোডৰ শাৰী কোন স্তৰে যোগ হৈছিল সোনকালে জানিব পাৰে। এইটো বিশেষকৈ কনফিগাৰেচন ফাইল বা ডিপেণ্ডেঞ্চি সংক্রান্ত সমস্যাৰ সময়ত গুৰুত্বপূর্ণ। প্ৰতিটো স্তৰ হাতৰেপে পৰীক্ষা নকৰাকৈ, যিকোনো ফাইলৰ উৎস স্তৰ আৰু সংশ্লিষ্ট Dockerfile নিৰ্দেশনা তৎক্ষণাত বিচাৰি পাব পাৰে।ফাইল লাইফচাইকেল অনুসৰণ (File Lifecycle Tracking)
OCI2Git এ আপোনাক কণ্টেইনাৰ ইমেজৰ ইতিহাসত এটা নিৰ্দিষ্ট ফাইলৰ যাত্ৰা অনুসৰণৰ সুবিধা দিয়ে। কেতিয়া ফাইলটো সৃষ্টি হৈছিল, কেনেকৈ স্তৰসমূহত সলনি হৈছিল, আৰু কেতিয়া মচি পেলোৱা হৈছিল তাক চাব পাৰে। এই বিস্তৃত দৃশ্যই ফাইলৰ পৰিবর্তন বুজিবলৈ সহায় কৰে, স্তৰসমূহত হাতৰেপে অনুসৰণ নকৰাকৈ।আপোনাৰ কণ্টেইনাৰ ইমেজত এটা ফাইলৰ ইতিহাস, কেতিয়া প্রথমে দেখা গৈছিল, সলনি বা ডিলিট হৈছিল জানিবলৈ, ৰূপান্তৰৰ পিছত এই Git কমাণ্ডসমূহ ব্যৱহাৰ কৰিব পাৰি:
# Full history of a file (including renames)
git log --follow -- /rootfs/my/file/pathFirst appearance (i.e. creation) - see which layer introduced the file
git log --diff-filter=A -- /rootfs/my/file/pathAll changes made to the file (with diffs)
git log -p --follow -- /rootfs/my/file/pathWhen the file was deleted
git log --diff-filter=D -- /rootfs/my/file/pathShow short commit info (concise layer history)
git log --follow --oneline -- /rootfs/my/file/path
এই আদেশবোৰে যিকোনো ফাইলৰ সম্পূৰ্ণ ইতিহাসক কন্টেইনাৰ স্তৰৰ মাজেৰে সহজে অনুসৰণ কৰিবলৈ সক্ষম কৰে, স্তৰৰ টাৰবলসমূহ ম্যানুৱেলিভাৱে উলিয়াই তুলনা কৰাৰ জটিলতা নাথাকে।
বহু-স্তৰ বিশ্লেষণ
কেতিয়াবা আটাইতকৈ গুৰুত্বপূর্ণ তুলনাবোৰ বহু অপৰ্যায়ী স্তৰৰ পৰিৱর্তন পৰীক্ষা কৰাৰ পৰা আহে। OCI2Git ব্যৱহাৰ কৰি, আপোনোৱে Git ৰ তুলনামূলক টুলসমূহ ব্যৱহাৰ কৰি বহু নিৰ্মাণ স্তৰৰ মাজত উপাদানসমূহ কেনেদৰে বিকাশ হৈছে বিশ্লেষণ কৰিব পাৰে, যি ধৰণৰ ধাৰণা কেৱল সংলগ্ন স্তৰৰ ক্ষেত্ৰত দেখিবলৈ নোৱাৰা।স্তৰ অন্বেষণ
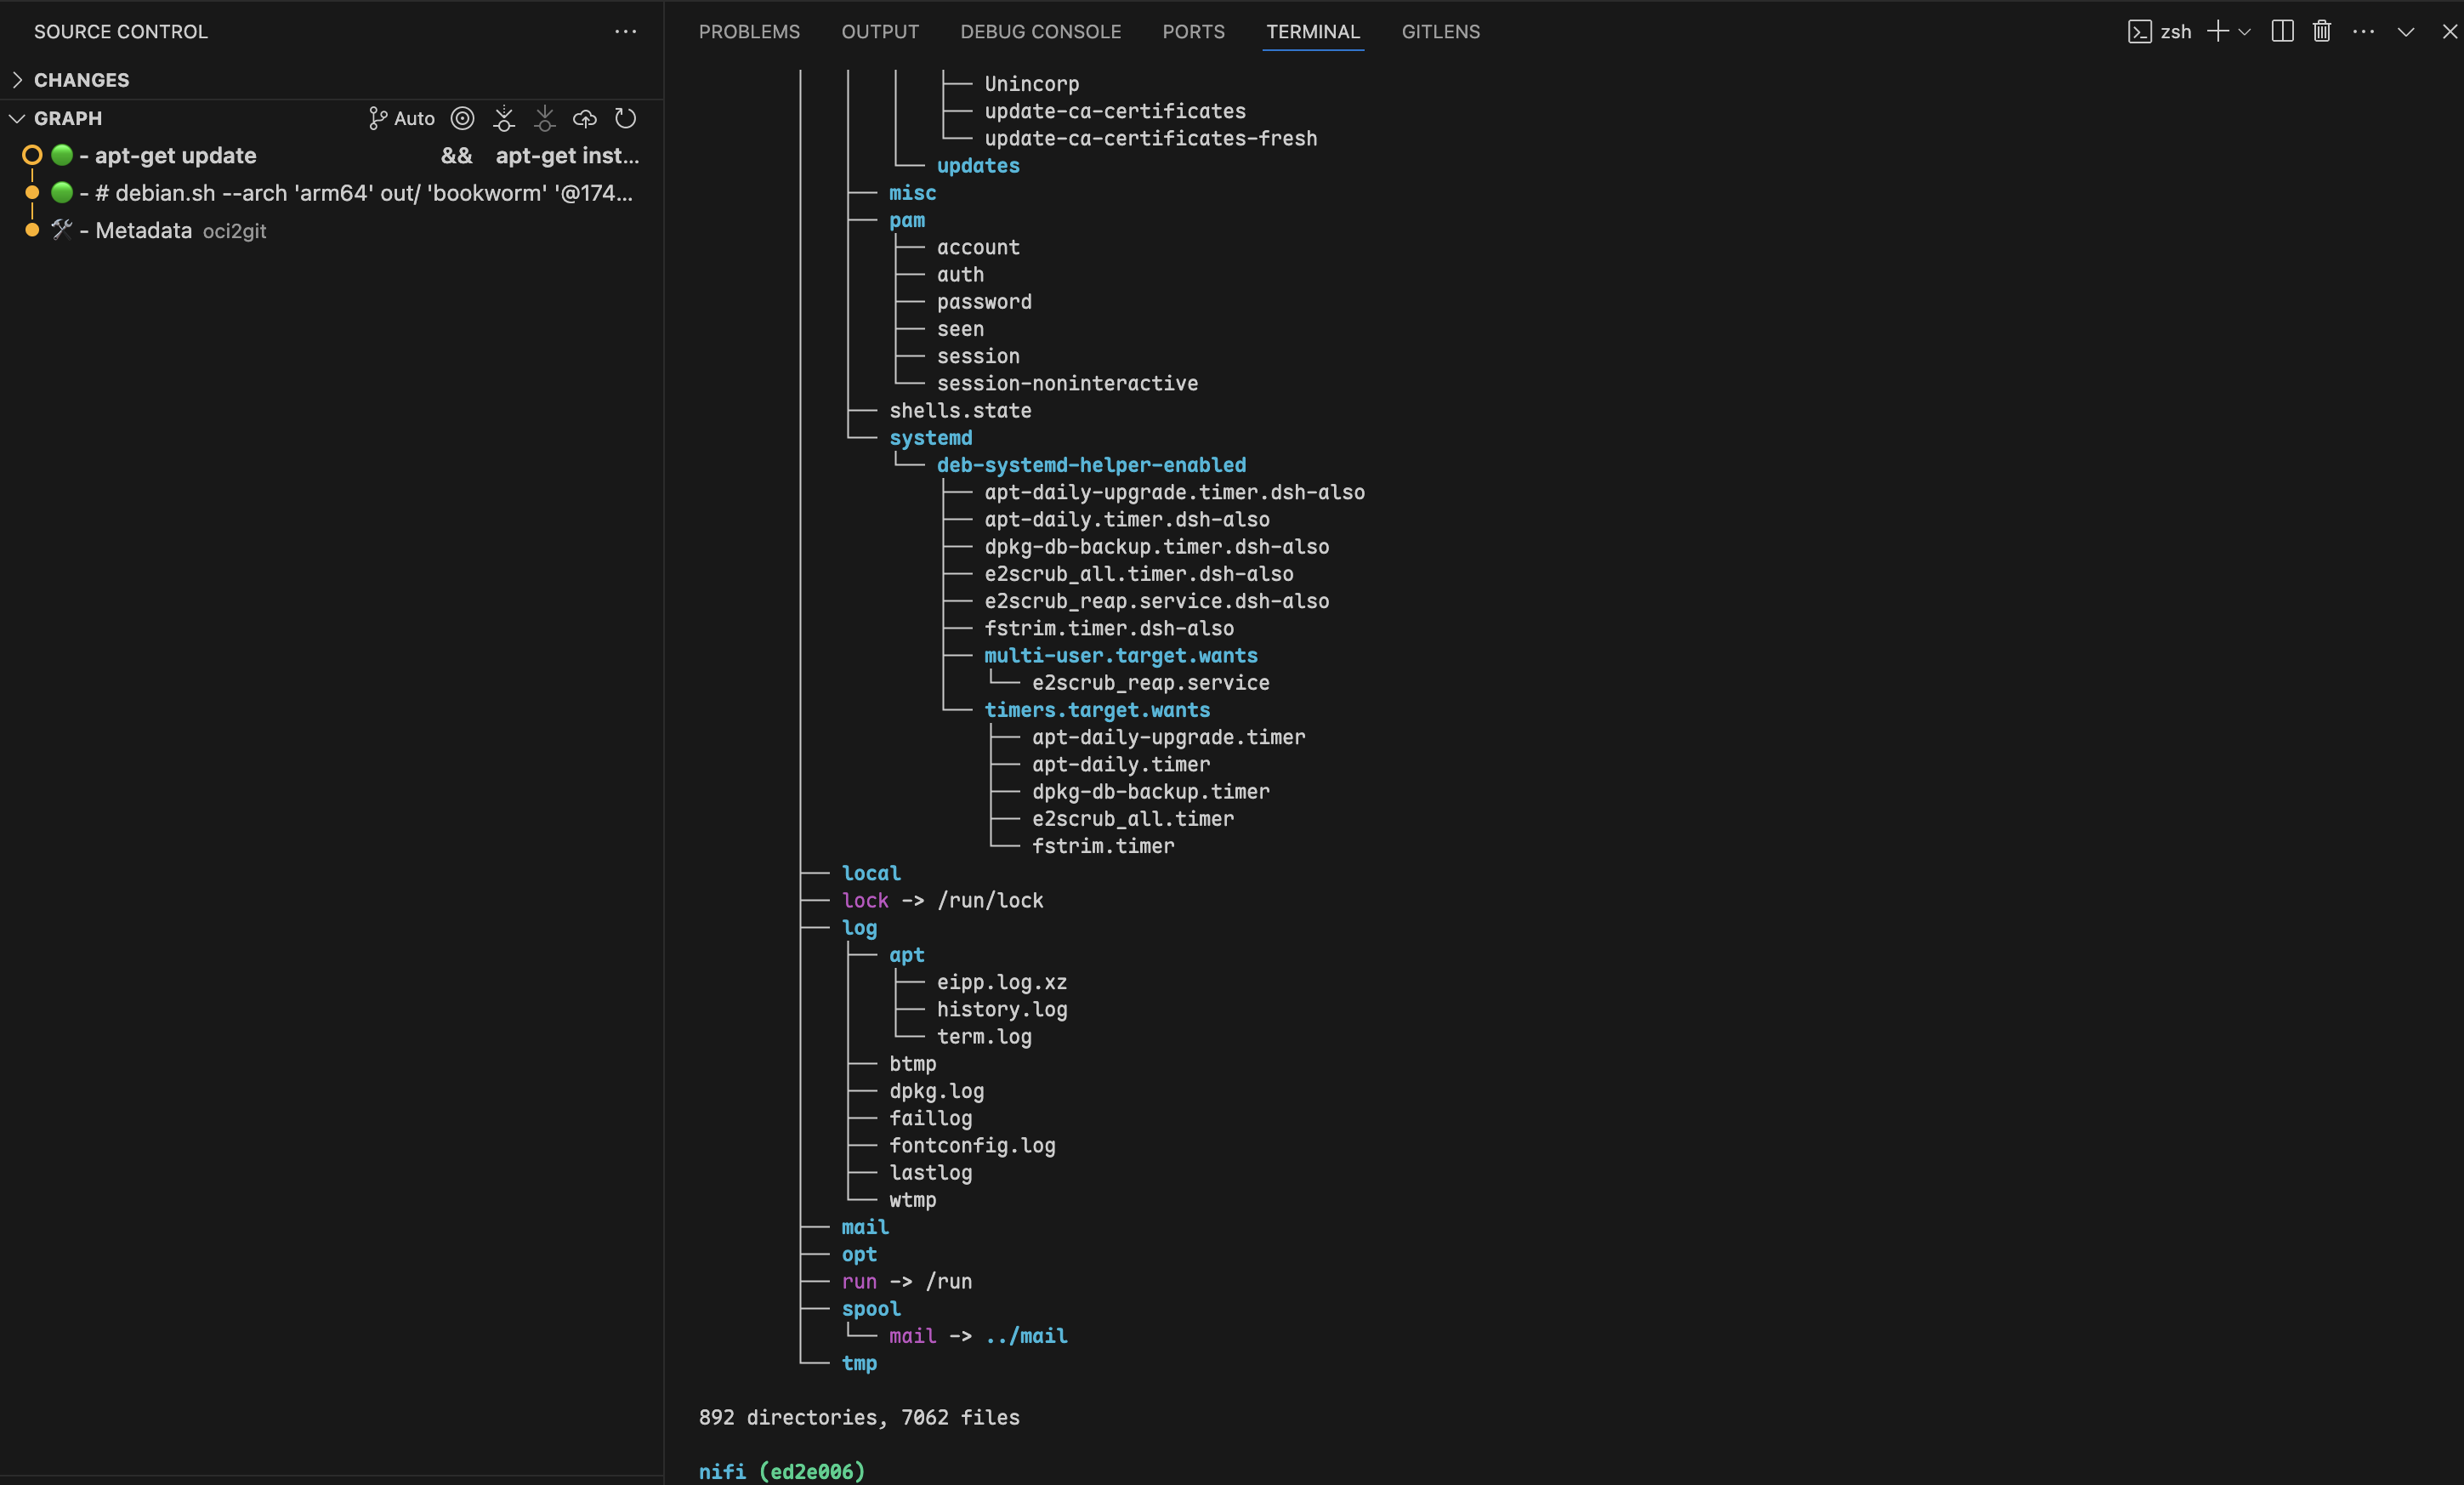
git checkout ব্যৱহাৰ কৰি যিকোনো নিৰ্দিষ্ট কমিটলৈ গতি কৰিলে, আপুনি কন্টেইনাৰৰ ফাইল চিস্টেম ঠিক সেই স্তৰত যিদৰে আছিল পৰীক্ষা কৰিব পাৰে। এইটো ডেভেলপাৰসকলক ছবিৰ সৃষ্টি প্ৰক্ৰিয়াৰ যিকোনো বিন্দুত ফাইল আৰু ডাইৰেক্টৰীৰ নিৰ্দিষ্ট অৱস্থা পৰীক্ষা কৰিবলৈ সক্ষম কৰে, যি ডিবাগিং বা কন্টেইনাৰৰ আচৰণ পৰীক্ষা কৰোঁতে অমূল্য প্ৰেক্ষাপট যোগান ধৰিছে।
বহু-ছবি বিশ্লেষণ
যেতিয়া একাধিক কন্টেইনাৰ ছবিত সাধাৰণ বংশধৰ থাকে, OCI2Git কেৱল ছবিসমূহ প্ৰকৃততে বিভাজিত হ'লে ব্রাঞ্চ সৃষ্টি কৰে। এইটো আপোনাক একেটা ৰেপজিটৰিত বহু সম্পৰ্কিত ছবি বিশ্লেষণ কৰিবলৈ সক্ষম কৰে আৰু তেওঁলোকৰ সাধাৰণ ইতিহাস সংৰক্ষণ কৰে।
# Convert first image to create the base repository
oci2git postgres:16.9-alpine3.21 -o alpConvert second image to the same output folder
oci2git nginx:1.28.0-alpine-slim -o alp- সকলো শ্বেয়াৰ কৰা স্তৰৰ সৈতে এটি সাধাৰণ মূল
- পৃথক শাখাসমূহ যি কেৱল ছবিসমূহ বাস্তৱতে ভিন্ন হ’লে বিভক্ত হয়
- স্পষ্ট ভিজুৱালাইজেশ্বন ক’ত ছবিসমূহে সাধাৰণ বংশধৰ ভাগ-বতৰা কৰে আৰু ক’ত তেওঁলোক পৃথক হয়
- বুদ্ধিমান নকল হেণ্ডলিং: একে ছবিখন দুবাৰ প্ৰক্ৰিয়া কৰিলে, অ্যালগৰিদমে চূড়ান্ত মেটাডাটা কমিটৰ আগতে এইটো চিনাক্ত কৰে আৰু নকল শাখা সৃষ্টি নকৰে
- ছবি পৰিয়াল বিশ্লেষণ: এটা ছবিৰ বিভিন্ন ভেৰিয়েণ্ট (বিভিন্ন সংস্কৰণ, স্থাপত্য, বা কনফিগাৰেচন) কেনেকৈ একে-একে সম্পৰ্কিত, সেইটো বুজা
- আধাৰ ছবিৰ প্ৰভাৱ: আধাৰ ছবিত হোৱা পৰিৱর্তনে কেনেকৈ বহুতো নিৰ্ভৰশীল ছবিত প্ৰভাৱ পেলায়, সেয়া দেখা
- অপ্টিমাইজেশ্বন সুযোগ: ভাগ-বতৰা কৰা উপাদানবোৰ চিনাক্ত কৰা, যি ছবিৰ ভেৰিয়েণ্টসমূহত বেছি ভাল ব্যৱহাৰ কৰিব পৰা যায়

অতিৰিক্ত ব্যৱহাৰ ক্ষেত্ৰ
- নিরাপত্তা অডিটিং: কেতিয়া সংকটজনক পেকেজ বা কনফিগাৰেচন যোগ হৈছিল, সেয়া ঠিক চিনাক্ত কৰক আৰু নিৰ্দিষ্ট বিল্ড নিৰ্দেশনালৈ উলিয়াই লৈ যাওক।
- ছবি অপ্টিমাইজেশ্বন: স্তৰৰ গঠন বিশ্লেষণ কৰি নকল অপাৰেচন বা বৃহৎ ফাইল বিচাৰি উলিয়াওক, যি সংহত কৰি ছবিৰ আকাৰ কমাবলৈ সহায় কৰিব।
- নির্ভৰশীলতা ব্যৱস্থাপনা: ছবি ইতিহাসৰ মাজত কেতিয়া নিৰ্ভৰশীলতা যোগ, উন্নীত, বা আঁতৰ কৰা হৈছিল সেয়া মনিটৰ কৰক।
- বিল্ড প্ৰক্ৰিয়া উন্নতি: Dockerfile নিৰ্দেশনা অপ্টিমাইজ কৰিবলৈ স্তৰৰ সংযোজন পৰীক্ষা কৰক যাতে বেছি ভাল কেছিং আৰু সৰু ছবি আকাৰ পাওয়া যায়।
- আনুমানিক ছবি তুলনা: বহুতো সম্পৰ্কিত ছবিক Git ৰেপ’জিট’ৰিলৈ ৰূপান্তৰ কৰক আৰু Git ৰ তুলনামূলক টুল ব্যৱহাৰ কৰি তেওঁলোকৰ পাৰ্থক্য আৰু মিল বিশ্লেষণ কৰক।
ইনষ্টলেশ্বন
পেকেজ মেনেজাৰসমূহ
#### macOS / Linux (Homebrew)
brew tap virviil/oci2git
brew install oci2git
#### ডেবিয়ান / উবুন্টু
সৰ্বশেষ মুক্তিৰ পৰা .deb পেকেজটো ডাউনলোড কৰি ইনষ্টল কৰক:
# For amd64 (x86_64)
wget https://github.com/virviil/oci2git/releases/latest/download/oci2git_VERSION_amd64.deb
sudo dpkg -i oci2git_VERSION_amd64.debFor arm64
wget https://github.com/virviil/oci2git/releases/latest/download/oci2git_VERSION_arm64.deb
sudo dpkg -i oci2git_VERSION_arm64.deb
#### আৰ্চ লিনাক্স (AUR)
# Using yay
yay -S oci2git-binUsing paru
paru -S oci2git-binManual installation
git clone https://aur.archlinux.org/oci2git-bin.git
cd oci2git-bin
makepkg -si
আগতে নিৰ্মিত বাইনেৰিসমূহ
আপোনাৰ প্লেটফৰ্মৰ বাবে উপযুক্ত বাইনেৰীটো সৰ্বশেষ ৰিলিজৰ পৰা ডাউনলোড কৰক:
# Linux x86_64
wget https://github.com/virviil/oci2git/releases/latest/download/oci2git-linux-x86_64.tar.gz
tar xzf oci2git-linux-x86_64.tar.gz
sudo mv oci2git-linux-x86_64 /usr/local/bin/oci2git
chmod +x /usr/local/bin/oci2gitmacOS (Apple Silicon)
wget https://github.com/virviil/oci2git/releases/latest/download/oci2git-darwin-aarch64.tar.gz
tar xzf oci2git-darwin-aarch64.tar.gz
sudo mv oci2git-darwin-aarch64 /usr/local/bin/oci2git
chmod +x /usr/local/bin/oci2git
Crates.io ৰ পৰা
cargo install oci2gitউৎসৰ পৰা
# Clone the repository
git clone https://github.com/virviil/oci2git.git
cd oci2gitInstall locally
cargo install --path .
ব্যৱহাৰ
oci2git [OPTIONS]
oci2git convert [OPTIONS]
oci2git fsbom [OPTIONS]
convert — OCI ইমেজ → Git ৰিপ'জিট'ৰি
oci2git convert [OPTIONS]
or simply:
oci2git -o, --output Git ৰিপজিটৰীৰ বাবে আউটপুট ডাইৰেক্টৰি [ডিফল্ট: ./container_repo]
-e, --engine ব্যৱহাৰ কৰিবলগীয়া কণ্টেইনাৰ ইঞ্জিন (docker, nerdctl, tar) [ডিফল্ট: docker]
-v, --verbose বিস্তৃত মোড (-v তথ্যৰ বাবে, -vv ডিবাগৰ বাবে, -vvv ট্ৰেছৰ বাবে)fsbom — ফাইলচিষ্টেম বিল অফ মেটেৰিয়েলছ
oci2git fsbom [OPTIONS] বিকল্পসমূহ:
-o, --output YAML BOM ফাইলৰ বাবে আউটপুট পথ [ডিফল্ট: ./fsbom.yml]
-e, --engine ব্যৱহাৰ কৰিব লগা কণ্টেইনাৰ ইঞ্জিন (docker, nerdctl, tar) [ডিফল্ট: docker]
-v, --verbose Verbose মোড (-v তথ্যৰ বাবে, -vv ডিবাগৰ বাবে, -vvv ট্ৰেচৰ বাবে)
পৰিৱেশ ভেৰিয়েবলসমূহ:
TMPDIR ইন্টাৰমিডিয়েট ডাটা প্ৰসেসিংৰ বাবে ব্যৱহৃত ডিফল্ট স্থান সলনি কৰিবলৈ এই পৰিৱেশ ভেৰিয়েবল ছেট কৰক। এইটো প্লেটফৰ্ম-নির্ভৰ (উদাহৰণস্বৰূপ, Unix/macOS-ত TMPDIR, Windows-ত TEMP বা TMP).
উদাহৰণসমূহ
ৰূপান্তৰ
Docker ইঞ্জিন ব্যৱহাৰ কৰি (ডিফল্ট):
oci2git ubuntu:latest
or explicitly:
oci2git convert ubuntu:latest -o ./ubuntu-repooci2git convert -e tar -o ./ubuntu-repo /path/to/ubuntu-latest.tarটাৰ ইঞ্জিনে এটা বৈধ OCI ফৰ্মেট টাৰবল আশা কৰে, যি সাধাৰণতে docker save ব্যৱহাৰ কৰি সৃষ্টি কৰা হয়:
# Create a tarball from a local Docker image
docker save -o ubuntu-latest.tar ubuntu:latestConvert the tarball to a Git repository
oci2git convert -e tar -o ./ubuntu-repo ubuntu-latest.tar
এইটো ./ubuntu-repo ত এটা Git ৰিপ'জিট'ৰি সৃষ্টি কৰিব য'ত এইবোৰ থাকিব:
Image.md- চিত্ৰটোৰ সম্পূৰ্ণ মেটাডেটা Markdown ফৰ্মেটতrootfs/- কণ্টেইনাৰৰ পৰা আহৰণ কৰা ফাইলচিষ্টেমৰ সামগ্ৰী
- প্ৰথম কমিটত কেৱল
Image.mdফাইলটো সম্পূৰ্ণ মেটাডেটাৰ সৈতে থাকে - পাছৰ প্ৰতিটো কমিট মূল চিত্ৰৰ এটা স্তৰক প্ৰতিনিধিত্ব কৰে
- কমিটবোৰত Dockerfile কমাণ্ডটো কমিট মেছেজ হিচাপে থাকে
ফাইলচিষ্টেম বিল অফ মেটেৰিয়েলছ (fsbom)
প্ৰত্যেকটা স্তৰত অন্তৰ্ভুক্ত বা পৰিবৰ্তিত কৰা প্ৰতিটো ফাইলৰ YAML তালিকা উত্পন্ন কৰক:
oci2git fsbom ubuntu:latest -o ubuntu.ymloci2git fsbom -e tar image.tar -o image-bom.ymlfile, hardlink, symlink, directory) আৰু স্থিতি (n:uid:gid নতুনৰ বাবে, m:uid:gid পৰিবৰ্তিতৰ বাবে) অনুসৰি টেগ কৰা থাকে। মচি দিয়া ফাইলসমূহ (OCI whiteouts) বাদ দিয়া হয়।layers:
- index: 0
command: "ADD rootfs.tar.gz / # buildkit"
digest: "sha256:45f3ea58..."
entries:
- type: file
path: "bin/busybox"
size: 919304
mode: 493
stat: "n:0:0"
- type: hardlink
path: "bin/sh"
target: "bin/busybox"
stat: "n:0:0"
- type: symlink
path: "lib64"
target: "lib"
stat: "n:0:0"
- index: 1
command: "RUN apk add --no-cache curl"
digest: "sha256:..."
entries:
- type: file
path: "usr/bin/curl"
size: 204800
mode: 493
stat: "n:0:0"
- type: file
path: "etc/apk/world"
size: 32
mode: 420
stat: "m:0:0"ৰিপ'জিট'ৰী গঠন
repository/
├── .git/
├── Image.md     # Complete image metadata
└── rootfs/      # Filesystem content from the container
আৱশ্যকতাসমূহ
- ৰাষ্ট ২০২১ সংস্কৰণ
- ডকৰ CLI (ডকৰ ইঞ্জিন সমৰ্থনৰ বাবে)
- গিট
লাইচেঞ্চ
MIT
[ডকুমেণ্টেশ্বন]: https://docs.rs/oci2git/
--- Tranlated By Open Ai Tx | Last indexed: 2026-04-02 ---